Home

Bybeatrice

guide to sorrento and amalfi coast

Sorrento and the Amalfi Coast offer breathtaking landscapes, rich history, and vibrant culture. This guide provides tips on planning your trip, exploring attractions, and enjoying local cuisine.

Overview

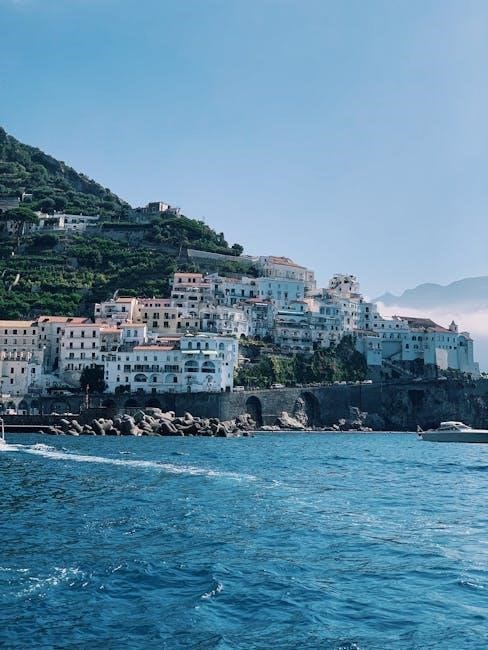
The Amalfi Coast and Sorrento captivate visitors with stunning cliffside views, crystal-clear waters, and charming hilltop towns. Sorrento serves as an ideal base for exploring nearby Capri and the Amalfi Coast. The region is renowned for its historic sites, vibrant culture, and exquisite cuisine. Enjoy fresh seafood, local wines, and traditional dishes like limoncello-infused desserts. With its breathtaking landscapes and rich heritage, this destination offers endless opportunities for exploration, relaxation, and unforgettable experiences.

Highlights

The Amalfi Coast and Sorrento boast iconic destinations like Positano, Amalfi, and Ravello, each offering stunning views and historic charm. Enjoy breathtaking sunsets, crystal-clear waters, and scenic hikes. Sorrento’s lemon groves and local cuisine, including fresh seafood and limoncello, are must-tries. Explore ancient ruins like Pompeii and Herculaneum for a glimpse into history. Boat tours to Capri and the Blue Grotto are unforgettable experiences. With its vibrant culture, picturesque villages, and natural beauty, this region is a paradise for travelers seeking adventure, relaxation, and unforgettable memories.

Getting There

Naples International Airport is the nearest, with buses, trains, and ferries connecting to Sorrento. The port of Sorrento is a key arrival point for coastal explorations.

Arrival

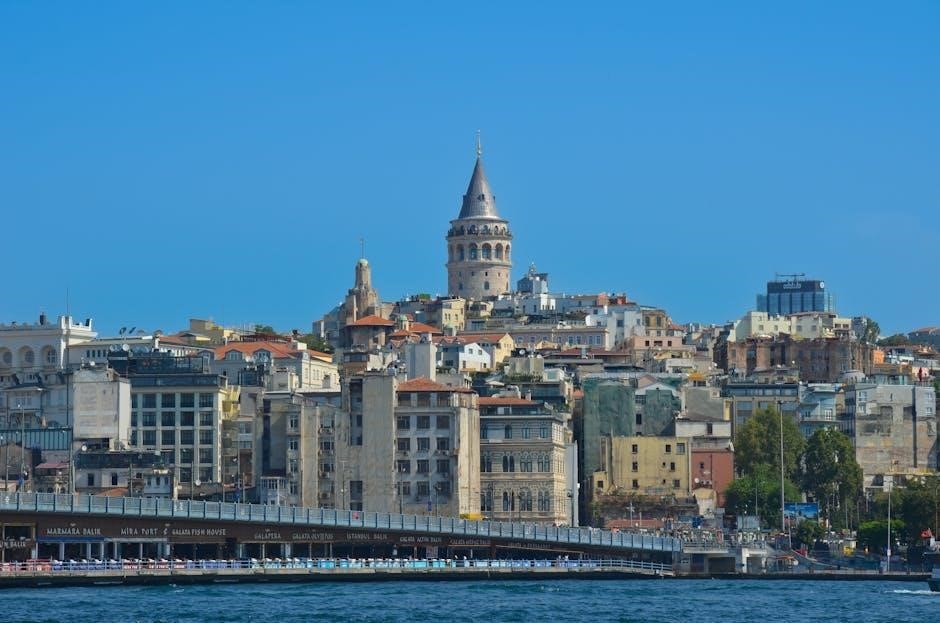
Arriving in Sorrento and the Amalfi Coast is convenient via Naples International Airport, the closest major airport. From there, travelers can take buses, trains, or ferries to reach Sorrento. The port of Sorrento is a popular arrival point for those exploring the coast by sea. Upon arrival, visitors are greeted by stunning views of the Bay of Naples and the Mediterranean Sea, setting the tone for an unforgettable Italian adventure. The region’s well-connected transport network ensures seamless travel to nearby towns and attractions.

Transport

Getting around Sorrento and the Amalfi Coast is easy with various transport options. Buses, including the SITA network, connect towns and villages, offering stunning coastal views. Ferries are a popular choice for exploring nearby islands like Capri and Positano. Trains, such as the Circumvesuviana line, provide efficient travel between Sorrento and Naples. Renting a car or scooter allows flexibility, though narrow coastal roads require caution. Public transport is convenient, but private transfers or taxis are ideal for comfort. Planning ahead ensures smooth travel in this picturesque region.

Stay

Sorrento and the Amalfi Coast offer a variety of accommodations, from luxury hotels to charming B&Bs and seaside villas, ensuring a perfect stay amidst stunning Mediterranean views and convenience.

Types

The Amalfi Coast and Sorrento offer diverse accommodations to suit all preferences. Boutique hotels provide elegant stays with stunning sea views, while luxury villas cater to those seeking privacy and opulence. For a more intimate experience, charming B&Bs and family-run guesthouses are ideal. Vacation rentals, including apartments and cottages, offer flexibility for longer stays. Agriturismos, nestled in rural areas, blend rustic charm with modern comforts. Budget-friendly options like hostels and camping sites are perfect for travelers exploring the region without breaking the bank.

Areas

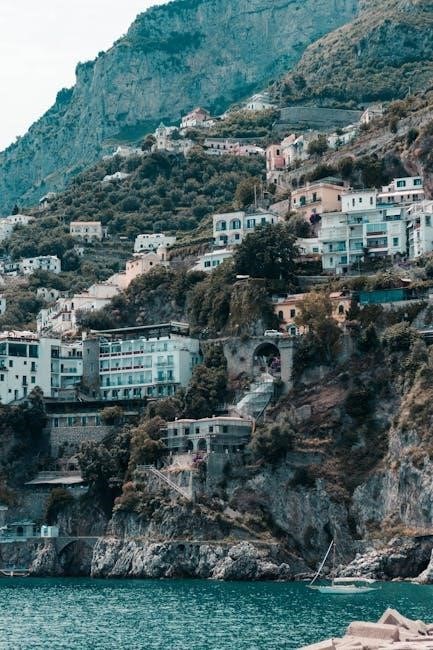
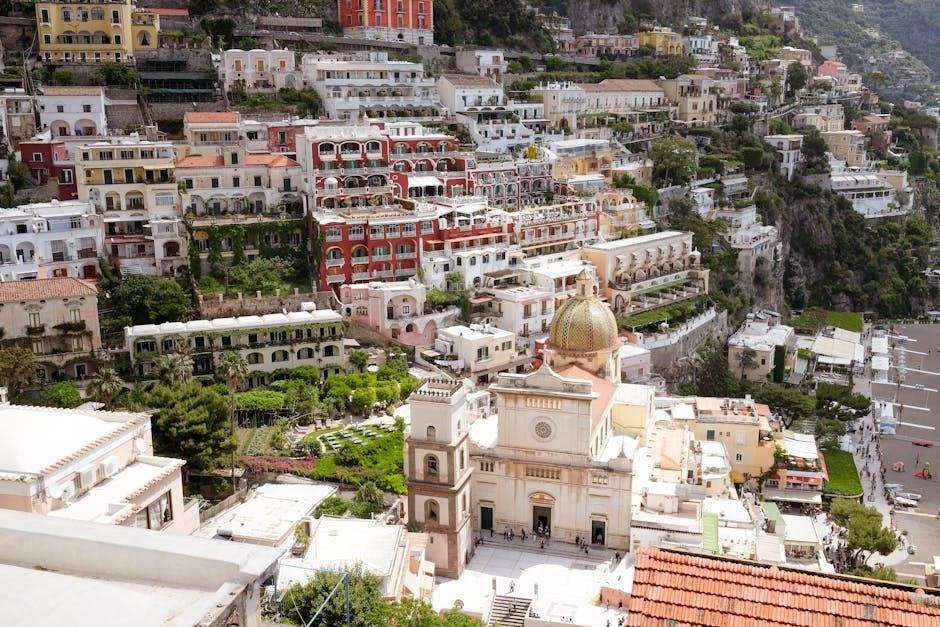
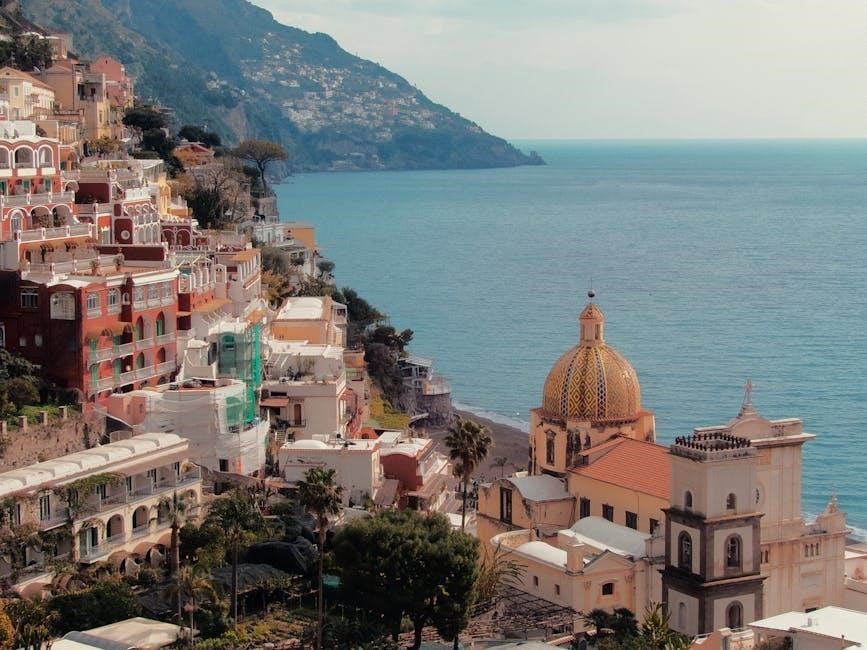
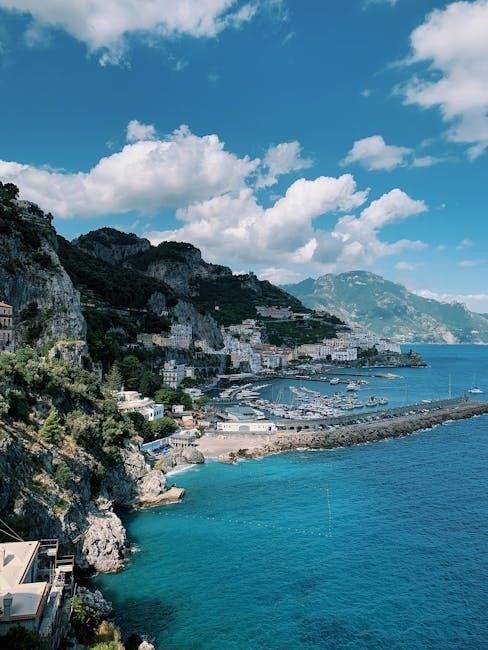
Sorrento and the Amalfi Coast boast diverse areas to explore. Sorrento’s historic center and marina offer a vibrant atmosphere, while nearby towns like Positano, Amalfi, and Ravello provide stunning coastal views and charming streets; The island of Capri is a popular day-trip destination, known for its natural beauty and upscale vibe. Each area has its own unique character, from the colorful houses of Positano to the serene villas of Ravello, making the region a perfect blend of culture, history, and breathtaking landscapes to discover.

Things to Do

Explore Sorrento and the Amalfi Coast’s rich history, stunning landscapes, and vibrant culture. Discover ancient ruins, enjoy boat tours, hike scenic trails, and savor delicious local cuisine.

Attractions

The Amalfi Coast and Sorrento boast stunning attractions, from the iconic Piazza Tasso in Sorrento to the colorful towns of Positano and Amalfi. Explore ancient ruins like Pompeii, take a boat trip to Capri’s Blue Grotto, or visit the historic Cathedral of Sant’Andrea. The scenic Amalfi Coast Drive offers breathtaking views, while the island of Capri enchants with its natural beauty. Don’t miss the Sentiero degli Dei (Path of the Gods) for unforgettable hiking experiences.

Activities

Discover the Amalfi Coast’s vibrant activities, from boat tours to explore hidden coves to hiking the famous Path of the Gods. Enjoy snorkeling in crystal-clear waters or relax on stunning beaches. Visit local vineyards for wine tasting and savor the region’s renowned cuisine. Explore ancient ruins like Pompeii and Herculaneum, or take a scenic drive along the coast. Don’t miss the chance to visit Sorrento’s historic sites and immerse yourself in the local culture, blending history, nature, and culinary delights for an unforgettable experience.

Culture

The Amalfi Coast is steeped in rich cultural heritage, from ancient ruins to vibrant local traditions. Visit Pompeii and Herculaneum to explore preserved Roman history. Experience the region’s festivals, such as the colorful lemon festivals in Sorrento. Discover local artisans crafting ceramics, lace, and limoncello. Attend a traditional Neapolitan music performance or stroll through quaint villages like Positano, where colorful houses and narrow streets reflect Mediterranean charm. Immerse yourself in the local way of life, blending history, art, and tradition for a truly authentic experience.

Dining

Indulge in Sorrento’s culinary delights, featuring fresh seafood, locally-grown produce, and traditional dishes like pizza margherita. Don’t miss limoncello, a regional specialty, and stunning cliffside dining experiences.

Cuisine

The Amalfi Coast and Sorrento boast a vibrant culinary scene, deeply rooted in Mediterranean traditions. Fresh seafood, locally-grown lemons, and fragrant herbs dominate the dishes. Pizza Margherita, originating from nearby Naples, is a must-try, while spaghetti alle vongole (spaghetti with clams) showcases the region’s seafood prowess. Lemons are celebrated in desserts like lemon tiramisu and the iconic limoncello, a zesty liqueur perfect for sipping. Local vineyards produce crisp whites, such as Falanghina, pairing beautifully with the area’s fresh, flavorful cuisine. Each dish reflects the region’s commitment to simplicity and high-quality ingredients.

Restaurants

Sorrento and the Amalfi Coast are home to a diverse range of exceptional restaurants, blending traditional Mediterranean flavors with modern culinary creativity. From cozy trattorias to Michelin-starred establishments, the region offers unforgettable dining experiences. Ristorante La Fenice in Positano and Ristorante Del Cambio in Sorrento are renowned for their innovative takes on local ingredients. Fresh seafood, lemons, and olive oil are staples, while cliffside eateries like Trattoria da Gemma in Amalfi provide breathtaking views. Whether you’re seeking a romantic dinner or a casual meal, these restaurants promise an authentic taste of Italy, combining tradition with contemporary flair.

Day Trips

Explore nearby islands like Capri, discover the Amalfi Coast’s charming towns, or visit ancient ruins like Pompeii for a day of history and breathtaking landscapes.

Towns

The Amalfi Coast is home to picturesque towns like Positano, Amalfi, and Ravello, each offering unique charm. Positano’s colorful houses and steep streets captivate visitors, while Amalfi boasts stunning cathedral views. Ravello, perched on a hilltop, is celebrated for its music festivals and breathtaking panoramas. These towns offer a blend of history, culture, and natural beauty, making them perfect day trip destinations from Sorrento. Explore cobblestone streets, visit historic sites, and enjoy the region’s renowned cuisine and wine.

Destinations

The Amalfi Coast and surrounding areas boast a variety of captivating destinations. The island of Capri, known for its stunning Blue Grotto and luxurious vibe, is a must-visit. Ischia, another nearby island, offers thermal waters and pristine beaches. The Amalfi Coast itself features iconic towns like Positano and Amalfi, each with its own unique charm. These destinations provide a mix of natural beauty, cultural landmarks, and relaxation, making them perfect for day trips or extended stays. Explore historic sites, enjoy Mediterranean cuisine, and soak in the breathtaking views of this Italian paradise.

Practical Tips

Plan ahead, as peak season attracts crowds. Learn basic Italian phrases for better interactions. Carry euros for local transactions and use public transport for convenience. Enjoy responsibly!

Language

Italian is the primary language in Sorrento and the Amalfi Coast. While many locals speak English, learning basic phrases like Buon giorno (Good morning) and Grazie mille (Thank you very much) enhances your experience.
Google Translate can help with quick translations, but carrying a phrasebook is wise for offline situations.
Region-specific dialects may vary, but standard Italian is widely understood.
Don’t hesitate to ask locals for pronunciation tips—they’ll appreciate your effort to communicate in their language.

Currency

The official currency in Italy is the Euro (€).
It’s essential to have some cash, as not all local businesses accept credit cards.
ATMs are widely available for withdrawals, offering competitive exchange rates.
For quick currency conversions, use Google by typing “1 [your currency] to EUR” in the search bar.
Always compare rates at exchange offices to avoid higher fees.
Inform your bank of international transactions to avoid card restrictions.

Seasonal

The Amalfi Coast experiences a Mediterranean climate, with warm summers and mild winters.
Peak season runs from June to August, offering ideal weather for beach activities and boat tours.
Spring (March-May) and autumn (September-November) provide milder temperatures, perfect for hiking and sightseeing.
Winter (December-February) is cooler, with fewer tourists, making it great for exploring museums and enjoying local cuisine.
Plan your visit according to your preferences: summer for vibrant events or spring/autumn for a relaxed experience.

Sorrento and the Amalfi Coast captivate visitors with their stunning landscapes, rich history, and vibrant culture.
From the crystal-clear waters to the charming towns perched on cliffs, this region offers unforgettable experiences.
With its delicious cuisine, scenic hiking trails, and picturesque villages, it’s a paradise for travelers.
Whether you’re seeking relaxation, adventure, or cultural immersion, Sorrento and the Amalfi Coast promise an unforgettable journey.
Plan your trip wisely, embracing the season that suits your style, and create lasting memories in this Italian gem.

Bybeatrice

11 human body systems and their functions pdf

The human body consists of eleven interconnected organ systems, each with unique functions essential for maintaining life and overall bodily harmony. These systems collaborate to ensure proper physiological processes.

The Circulatory, Respiratory, and Digestive Systems

The circulatory system transports blood and oxygen, the respiratory system facilitates gas exchange, and the digestive system breaks down food for nutrient absorption, each vital for survival.

Circulatory System: Blood Circulation and Oxygen Delivery

The circulatory system, also known as the cardiovascular system, plays a vital role in transporting blood throughout the body. It consists of the heart, arteries, veins, and capillaries, which work together to ensure oxygenated blood reaches tissues and organs while removing carbon dioxide. The heart acts as the central pump, propelling blood through a network of vessels. Arteries carry oxygen-rich blood away from the heart, while veins return deoxygenated blood to it. Capillaries facilitate the exchange of oxygen, nutrients, and waste products at the cellular level. This system is essential for maintaining cellular function, supporting immune responses, and regulating body temperature. Without efficient blood circulation, tissues would not receive the oxygen and nutrients necessary for survival, making the circulatory system a cornerstone of overall health and vitality.

Respiratory System: Breathing and Gas Exchange

The respiratory system is responsible for the process of breathing, enabling the exchange of oxygen and carbon dioxide. It includes the nose, trachea, bronchi, and lungs, which work together to facilitate gas exchange. When air is inhaled through the nose or mouth, it passes through the trachea and bronchi, eventually reaching the alveoli in the lungs. Here, oxygen diffuses into the bloodstream, while carbon dioxide is expelled during exhalation. This system also filters, warms, and humidifies the air we breathe, protecting the body from harmful particles. The respiratory system is crucial for delivering oxygen to cells and removing waste gases, ensuring proper cellular function and overall vitality. Its efficient operation is essential for maintaining energy production, physical activity, and life itself. Without it, the body would quickly succumb to oxygen deprivation and toxin buildup.

Digestive System: Food Breakdown and Nutrient Absorption

The digestive system is responsible for breaking down food into smaller molecules and absorbing essential nutrients. It consists of the mouth, esophagus, stomach, small intestine, and large intestine. In the mouth, food is chewed and mixed with saliva to begin the digestion process. The esophagus transports food to the stomach, where it is further broken down by gastric juices. The small intestine absorbs nutrients into the bloodstream with the help of finger-like projections called villi. The large intestine absorbs water and eliminates waste. This system ensures the body receives the necessary nutrients for energy, growth, and repair. Proper digestion is vital for maintaining overall health and preventing nutritional deficiencies. The digestive system works in harmony with other systems, such as the circulatory, to distribute nutrients efficiently throughout the body. Its functions are essential for sustaining life and supporting bodily functions. Without it, the body would be unable to utilize food effectively, leading to malnutrition and health complications.

The Nervous and Muscular Systems

The nervous and muscular systems collaborate to enable voluntary movements, maintain posture, and regulate bodily responses through neural signals and muscle contractions, ensuring coordination and support.

Nervous System: Control and Coordination of Body Functions

The nervous system is a complex network responsible for controlling and coordinating body functions. It consists of the central nervous system (CNS), including the brain and spinal cord, and the peripheral nervous system (PNS), which connects the CNS to the rest of the body. The nervous system enables communication through electrical and chemical signals, allowing for functions such as sensory perception, movement, and cognitive processes. It also regulates involuntary actions like heartbeat and digestion. The nervous system’s ability to adapt and learn ensures the body’s responses to internal and external stimuli, making it essential for survival and overall bodily harmony. Its intricate structure and function highlight its vital role in maintaining life.

Muscular System: Movement and Support

The muscular system plays a vital role in enabling movement, maintaining posture, and providing support to the body. It consists of three types of muscles: skeletal, smooth, and cardiac. Skeletal muscles, attached to bones, facilitate voluntary movements, while smooth muscles handle involuntary actions like digestion. Cardiac muscle powers the heartbeat. Together, these muscles allow the body to move, maintain balance, and perform essential functions. The system also protects internal organs and aids in regulating body temperature. Its interaction with the nervous system ensures coordinated movements and responses to stimuli. The muscular system’s versatility and strength are crucial for daily activities, from walking to complex physical tasks, making it indispensable for overall bodily function and mobility. Its health directly impacts quality of life and physical performance.

The Endocrine and Reproductive Systems

The endocrine system regulates body functions through hormones, while the reproductive system ensures the production of offspring. Both systems interact to maintain health and enable reproduction.

Endocrine System: Hormone Production and Regulation

The endocrine system is a network of glands that produce and regulate hormones, which are chemical messengers controlling various bodily functions. The pancreas, thyroid, adrenal glands, and pituitary gland are key components. These glands release hormones that regulate metabolism, growth, and reproductive processes, ensuring proper bodily functions. Hormones also maintain homeostasis by managing blood sugar levels, electrolyte balance, and stress responses. The pituitary gland acts as the “master gland,” controlling the activity of other endocrine organs. By producing and regulating hormones, the endocrine system plays a vital role in maintaining overall health and enabling the body to function harmoniously. Its interactions with other systems ensure optimal physiological balance and responsiveness to internal and external changes.

Reproductive System: Production of Offspring

The reproductive system is specialized for the production of offspring, ensuring the continuation of the species. It consists of organs and tissues that enable sexual reproduction, including the ovaries, testes, uterus, and fallopian tubes. In females, the ovaries produce eggs (oocytes) and hormones like estrogen, while the uterus nurtures the developing embryo during pregnancy. In males, the testes produce sperm and testosterone, essential for fertility. The system facilitates fertilization by transporting sperm and egg to the fallopian tubes, where conception occurs. After fertilization, the embryo develops in the uterus, supported by the placenta. The reproductive system also regulates secondary sexual characteristics and prepares the body for childbirth. Its functions are vital for human reproduction, ensuring the survival of the species through the creation of new life. Proper functioning of this system is essential for the perpetuation of human existence and genetic diversity.

The Urinary (Excretory) and Lymphatic Systems

The urinary system removes waste and regulates fluid balance, while the lymphatic system supports immune defense and waste removal, ensuring proper bodily detoxification and immune function together.

Urinary System: Waste Removal and Fluid Balance

The urinary system, also known as the excretory system, plays a crucial role in eliminating waste and maintaining fluid balance within the body. Its primary organs include the kidneys, ureters, bladder, and urethra. The kidneys filter blood to remove waste products, such as urea, and excess substances like water and salts, producing urine in the process. This urine then travels through the ureters to the bladder, where it is stored until it is expelled from the body via the urethra. Additionally, the urinary system regulates electrolyte levels and helps maintain acid-base balance, which are essential for proper bodily functions. Without this system, toxins would accumulate, leading to severe health complications.

Lymphatic System: Immune Defense and Waste Removal

The lymphatic system is vital for immune defense and waste removal, ensuring the body remains protected and free from harmful substances. It consists of lymph nodes, the spleen, lymph vessels, and lymph fluid. This system filters pathogens, such as bacteria and viruses, from the lymph fluid, preventing infections. It also aids in the removal of waste products that the circulatory system cannot process. Additionally, the lymphatic system produces immune cells, like lymphocytes, which play a key role in fighting infections and diseases. By maintaining fluid balance and supporting the immune response, the lymphatic system is essential for overall health and proper bodily function. Its interconnected network ensures that toxins and pathogens are efficiently neutralized or removed, safeguarding the body’s well-being.

Bybeatrice

with the old breed pdf

E.B. Sledge’s With the Old Breed is a gripping WWII memoir detailing his experiences in the Pacific Theater, offering profound insights into combat’s harsh realities. Available as a PDF, it remains a vital historical resource.

Overview of the Memoir

With the Old Breed, written by E.B. Sledge, is a captivating memoir detailing the author’s experiences during World War II. Published in 1981, it chronicles Sledge’s journey from rigorous Marine Corps training to the brutal battles of Peleliu and Okinawa. The memoir vividly portrays the physical and emotional toll of combat, offering a raw, unfiltered perspective on the realities of war. Sledge’s firsthand account provides a deeply personal and historical insight into the Pacific Theater, making it a significant work for understanding the sacrifices and challenges faced by soldiers during WWII.

Importance of the Book in Historical Context

With the Old Breed stands as a masterpiece of WWII literature, offering an unflinching account of the Pacific Theater. It captures the brutality of battles like Peleliu and Okinawa, providing a soldier’s-eye view of the war. Sledge’s vivid descriptions of combat and its psychological toll have made the memoir a vital historical resource. Its raw honesty and emotional depth have influenced modern understanding of WWII, making it essential for historians and readers seeking authentic wartime narratives. The book’s ability to balance personal reflection with historical context ensures its enduring relevance in understanding the sacrifices of soldiers during one of history’s darkest periods.

Historical Context of the Pacific Theater in WWII

The Pacific Theater in WWII was marked by brutal island-hopping campaigns, with battles like Peleliu and Okinawa showcasing the sacrifices of soldiers like E.B. Sledge.

The Battles of Peleliu and Okinawa

The battles of Peleliu and Okinawa were pivotal in the Pacific Theater, marked by relentless fighting and heavy casualties. E.B. Sledge’s memoir vividly captures the brutality faced by Marines, detailing the horrors of close combat, harsh conditions, and psychological toll. These battles, though often overlooked, were crucial in securing Allied victories. Sledge’s account offers a raw, personal perspective on the sacrifices made during these intense campaigns, providing a haunting yet essential glimpse into WWII’s Pacific front. His experiences underscore the resilience and courage of soldiers in the face of unimaginable adversity.

The Role of the First Marine Division

The First Marine Division played a central role in the Pacific Theater, particularly in the battles of Peleliu and Okinawa. As a member of this elite unit, E.B. Sledge witnessed firsthand the division’s unwavering resolve and sacrifice. The Marines’ rigorous training and camaraderie were crucial in overcoming the enemy’s fierce resistance. Their bravery and tenacity in these campaigns were instrumental in securing Allied victories, despite the immense challenges they faced. Sledge’s memoir highlights the Division’s esprit de corps and the enduring impact of their service on the war’s outcome.

Key Themes and Insights from the Memoir

E.B. Sledge’s memoir reveals the harsh realities of combat, the psychological toll on soldiers, and the unbreakable bonds of brotherhood forged in the chaos of war.

The Harsh Realities of Combat and Training

E.B. Sledge’s memoir vividly portrays the brutal physical and mental challenges of Marine training, designed to break recruits and prepare them for the horrors of war. The battles of Peleliu and Okinawa exposed soldiers to relentless violence, starvation, and disease, while the psychological toll of constant combat left lasting scars. Sledge’s unflinching account reveals the dehumanizing effects of war and the moral dilemmas faced by soldiers in the Pacific Theater, offering a raw and unforgettable glimpse into the true cost of survival in combat.

Personal Reflections and Emotional Toll of War

E.B. Sledge’s memoir delves deeply into the emotional and psychological scars left by the war, capturing the personal struggles of a soldier grappling with unimaginable horrors. The vivid descriptions of camaraderie, loss, and moral dilemmas reveal the human cost of conflict. Sledge’s reflections on the lasting impact of trauma, including nightmares and survivor’s guilt, offer a poignant reminder of war’s enduring emotional toll. His story transcends mere historical account, becoming a powerful exploration of the human spirit’s resilience and vulnerability in the face of extreme adversity.

Availability of “With the Old Breed” in PDF Format

With the Old Breed is widely available in PDF format for free download on platforms like Open Library, Z-Library, and other digital repositories, ensuring easy access to this historical memoir.

Free Download Options and Platforms

E.B. Sledge’s With the Old Breed is available for free download in PDF format from platforms like Open Library and Z-Library. These repositories offer easy access to the memoir, ensuring its historical significance reaches a wide audience. Users can download the book directly without subscription or payment, making it a convenient option for readers worldwide. Additionally, the PDF format allows for seamless reading on various devices, preserving the vivid accounts of WWII’s Pacific Theater. This accessibility highlights the importance of digital literature in keeping historical narratives alive for future generations.

Importance of Digital Access to Historical Literature

Digital access to With the Old Breed in PDF format ensures that E.B. Sledge’s harrowing WWII memoir reaches a global audience, preserving its historical significance. By making such literature available online, platforms like Open Library and Z-Library democratize education, allowing readers to engage with primary sources effortlessly. This digital preservation not only honors the experiences of veterans but also educates future generations about the realities of war. The convenience of PDF downloads fosters a deeper understanding of history, ensuring that stories like Sledge’s remain relevant and accessible in the modern age.

Reception and Impact of the Memoir

With the Old Breed is hailed as a masterpiece, with critics praising its haunting portrayal of WWII’s Pacific Theater. Its influence deepens modern understanding of wartime sacrifices and heroism.

Critical Reviews and Legacy

With the Old Breed has received widespread acclaim for its raw authenticity. The New York Review of Books called it a “masterpiece,” while The Wall Street Journal described it as “haunting.” Critics praise Sledge’s unflinching portrayal of war’s brutality, making it one of the most respected WWII memoirs. Its legacy endures as a definitive account of the Pacific Theater, offering unparalleled insights into the psychological and physical toll of combat. The book remains a vital resource for historians and readers seeking a genuine understanding of wartime experiences.

Influence on Modern Understanding of WWII

With the Old Breed has profoundly shaped modern perceptions of WWII, particularly the Pacific Theater. Its vivid recounting of battles like Peleliu and Okinawa provides a soldier’s-eye view, humanizing the conflict. The memoir’s availability in PDF and digital formats ensures accessibility for new generations, fostering a deeper understanding of the war’s impact. By offering raw, unfiltered accounts, Sledge’s work bridges history and personal narrative, influencing scholars, filmmakers, and the public. Its influence extends beyond literature, contributing to a more nuanced comprehension of WWII’s complexities and the sacrifices made.

With the Old Breed remains a poignant and vital account of WWII, offering a raw, personal perspective on war’s realities. Its availability in PDF ensures lasting accessibility.

Final Thoughts on the Memoir’s Significance

With the Old Breed stands as a testament to the raw, unfiltered truths of war, offering a deeply personal and emotional account of a Marine’s experience in WWII. Sledge’s vivid descriptions of the battles of Peleliu and Okinawa, coupled with his reflections on the psychological toll of combat, provide unparalleled insight into the human cost of war. Its availability in PDF format ensures that future generations can access this vital historical narrative, preserving the voices of those who endured unimaginable hardship. The memoir remains a haunting yet essential read for anyone seeking to understand the realities of war.

Encouragement to Read the Full Book

Reading With the Old Breed in its entirety is an absolute necessity for anyone seeking a genuine understanding of WWII’s Pacific Theater. E.B. Sledge’s unflinching narrative provides a raw, emotional, and deeply personal account of war’s brutality. The memoir’s vivid storytelling and historical significance make it a compelling read. Its availability in PDF format ensures accessibility, allowing readers to immerse themselves in Sledge’s journey. This book is not just a historical document but a poignant reminder of the sacrifices made by soldiers. It is a must-read for anyone looking to grasp the true essence of war and its lasting impact on those who fought it.

Bybeatrice

osha 30 study guide

The Occupational Safety and Health Administration (OSHA) ensures workplace safety nationwide. The 30-Hour Study Guide provides comprehensive training materials for understanding safety standards and regulations, aiding in exam preparation and workplace compliance.

1.1 Overview of OSHA and Its Role in Workplace Safety

The Occupational Safety and Health Administration (OSHA) is a federal agency responsible for ensuring safe and healthy working conditions. Established in 1971, OSHA sets and enforces safety standards, provides training, and conducts workplace inspections to prevent injuries, illnesses, and fatalities. Its role extends to all industries, focusing on hazard identification, risk mitigation, and compliance with regulations. By promoting a culture of safety, OSHA protects millions of workers, helping employers create safer environments and reduce workplace accidents. The agency’s efforts are supported by outreach programs, educational materials, and partnerships with industries to enhance workplace safety nationwide.

1.2 Importance of the OSHA 30-Hour Training Program

The OSHA 30-Hour Training Program is essential for fostering a safe workplace culture by equipping workers with in-depth knowledge of safety standards and hazard prevention. Designed for supervisors and workers in construction and general industries, this program ensures compliance with OSHA regulations, reducing workplace accidents and legal risks. Participants gain practical insights into identifying and mitigating hazards, enabling them to create safer environments. The curriculum covers critical topics like fall protection, electrical safety, and emergency response, providing a comprehensive understanding of workplace safety. By completing this training, individuals contribute to a safer workplace, benefiting both employees and employers. The program is supported by free study guides and practice tests.

1.3 Structure and Content of the OSHA 30 Study Guide

The OSHA 30 Study Guide is structured to provide a detailed and organized approach to understanding workplace safety. It includes modules covering hazard communication, fall protection, electrical safety, and fire safety, among others. The guide is divided into 23 modules, each focusing on specific safety topics, with study questions and bookmarks for easy navigation. Additional resources such as practice tests and instructor notes are available to enhance learning. The guide is designed to be thorough yet user-friendly, ensuring that participants gain a comprehensive understanding of OSHA standards and safety practices. This structure helps individuals prepare effectively for the final exam and apply their knowledge in real-world scenarios; The study guide is available in PDF format, making it accessible and convenient for learners. By following the guide, participants can ensure they are well-prepared for the OSHA 30-Hour Training Program and its associated exam.

Key Topics Covered in the OSHA 30 Study Guide

The OSHA 30 Study Guide covers essential safety topics such as hazard communication, fall protection, electrical safety, and fire safety, ensuring a comprehensive understanding of workplace safety standards and best practices.

2.1 Hazard Communication and Chemical Safety

Hazard communication and chemical safety are critical topics in the OSHA 30 Study Guide. The module emphasizes understanding chemical hazards, proper labeling, and Safety Data Sheets (SDS). Employees learn to identify risks associated with hazardous materials and implement safe handling practices. Training includes recognizing chemical hazards in the workplace, understanding hazard classification, and using personal protective equipment (PPE) effectively. The guide also covers emergency response procedures for chemical spills or exposure. This section ensures workers can safely manage chemicals, reducing accidents and ensuring compliance with OSHA standards. Proper training in this area is essential for maintaining a safe and healthy work environment.

2.2 Fall Protection and Prevention

Fall protection and prevention are essential topics in the OSHA 30 Study Guide, focusing on identifying and mitigating fall hazards. The module covers types of fall protection equipment, such as harnesses, lanyards, and anchor points, and explains proper installation and use. It emphasizes the importance of guardrails, safety nets, and other barriers to prevent falls. Training includes inspecting equipment, understanding OSHA regulations, and implementing rescue plans. The guide also addresses specific scenarios, like roof work and scaffolding, to ensure workers can safely perform tasks at heights. Proper fall protection practices are critical for reducing injuries and fatalities in the workplace.

2.3 Electrical Safety and Safe Work Practices

Electrical safety is a critical component of workplace safety, addressed in-depth in the OSHA 30 Study Guide. The module covers understanding electrical circuits, devices, and safe work practices to prevent shocks, arcs, and fires. Key topics include lockout/tagout procedures to ensure equipment is safely de-energized before maintenance. Personal protective equipment (PPE), such as insulated gloves and voltage-rated tools, is emphasized to protect workers from electrical hazards. The guide also outlines OSHA standards for electrical safety, including proper wiring, grounding, and hazard identification. By mastering these concepts, workers can safely perform tasks involving electrical systems, reducing the risk of injuries and fatalities.

2.4 Fire Safety and Emergency Response

Fire safety and emergency response are essential topics in the OSHA 30 Study Guide, focusing on preventing fires and ensuring effective emergency actions. The guide covers identifying fire hazards, proper use of extinguishers, and understanding fire classifications. It also emphasizes emergency evacuation plans, including exit routes, alarm systems, and assembly points. Workers learn how to respond during fires, including alerting others and using personal protective equipment (PPE). The module stresses regular fire drills and maintaining emergency equipment to ensure preparedness. Understanding these principles helps workers prevent fires and respond effectively, saving lives and reducing property damage in workplace emergencies.

Study Materials and Resources

The OSHA 30 Study Guide offers free PDF materials, practice tests, and online resources to aid in exam preparation and understanding workplace safety standards effectively.

3.1 The Official OSHA 30-Hour Study Guide PDF

The official OSHA 30-Hour Study Guide PDF is a comprehensive resource for workplace safety training. It contains detailed modules covering essential topics such as hazard communication, fall protection, and electrical safety. The guide is structured to help participants understand OSHA regulations and apply them in real-world scenarios. Many versions of the PDF include bookmarks for easy navigation, allowing users to quickly access specific sections. The guide also includes study questions and summaries to reinforce learning. It is widely available for free download, making it an accessible tool for both employees and employers seeking to comply with safety standards.

3.2 Practice Tests and Exam Preparation

Practice tests are essential for effective exam preparation in the OSHA 30-Hour Training Program. These tests simulate the actual exam format, helping participants assess their readiness. Many resources offer practice tests with 100 questions and detailed answers, covering topics like hazard communication, fall protection, and electrical safety. They allow learners to identify weak areas and focus their study efforts. Additionally, some materials include summarized instructor notes to reinforce key concepts. These tools are available for free online, making them accessible to everyone. Regularly taking practice tests ensures a thorough understanding of OSHA standards and improves confidence for the final exam.

3.3 Additional Online Resources for OSHA 30 Training

Beyond the official study guide, numerous online resources support OSHA 30 training. Websites offer free PDF guides, practice tests, and comprehensive materials. Platforms like Project Gutenberg provide free eBooks, while others offer detailed instructor notes and study questions. These resources cover topics like hazard communication, fall protection, and electrical safety. Many materials are available for free download without requiring payment or sensitive information. Additional resources include video tutorials, interactive modules, and forums where learners can discuss challenges. These tools enhance understanding and retention, ensuring participants are well-prepared for the OSHA 30-Hour Training Program and its final exam.

Test Preparation and Exam Strategy

Effective test preparation involves using practice tests and understanding the exam format. Focus on managing time, reviewing answers, and applying strategies for multiple-choice and scenario-based questions.

4.1 Tips for Passing the OSHA 30 Final Exam

To excel in the OSHA 30 final exam, thoroughly review the study guide and practice tests. Focus on understanding key concepts like hazard communication, fall protection, and electrical safety. Allocate sufficient time for each question, and avoid guessing. Review your answers before submitting to ensure accuracy. Emphasize scenarios and real-world applications to better grasp safety protocols. Utilizing the official study materials and online resources will enhance your preparation and confidence, leading to successful completion of the exam.

4.2 Understanding the Exam Format and Scoring

The OSHA 30 final exam consists of multiple-choice questions assessing knowledge of safety standards and practices. The exam format typically includes 100 questions, with a time limit for completion. Scoring is based on correct answers, with a passing score of at least 70%. Participants receive immediate results, and successful completion certifies their understanding of workplace safety protocols. Understanding the exam structure and scoring criteria helps candidates prepare effectively and manage their time wisely during the test. Proper review of study materials ensures familiarity with question formats and content, enhancing readiness for the assessment.

The Importance of OSHA Training in the Workplace

OSHA training improves workplace safety, reduces accidents, and ensures compliance with regulations. It fosters a culture of safety, protecting employees and employers while promoting efficiency and reputation.

5.1 Reducing Workplace Accidents and Injuries

OSHA training significantly reduces workplace accidents and injuries by educating employees on hazard identification and safe practices. According to recent data, OSHA 30 training has led to a 40% reduction in injury rates. Employers benefit from lower workers’ compensation claims and increased productivity. The curriculum covers key areas such as fall prevention, electrical safety, and fire hazards, ensuring workers are well-prepared to handle risks. Additionally, the free study guides and practice tests available online enhance understanding and retention of safety protocols, contributing to a safer work environment and fostering a culture of safety within organizations. This proactive approach saves lives and resources annually.

5.2 Ensuring Compliance with OSHA Standards

The OSHA 30-Hour Study Guide is a vital resource for ensuring compliance with OSHA standards, providing detailed insights into workplace safety regulations. It covers hazard communication, fall protection, and fire safety, helping employers and employees understand legal requirements. The guide includes modules on safety data sheets, chemical handling, and emergency response, ensuring alignment with OSHA’s updated standards. By following the study guide, workplaces can minimize violations and fines while promoting a culture of safety. Free PDF resources and practice tests further enhance understanding, making it easier for organizations to adhere to OSHA regulations and maintain a compliant, safe work environment for all employees.

Bybeatrice

dental fee guide alberta 2023

The Alberta Dental Fee Guide 2023 provides a comprehensive list of suggested fees for dental procedures, promoting transparency and standardization in dental care costs.

It helps patients and dentists understand treatment expenses, ensuring informed decisions and fair pricing across Alberta.

Updated annually, the guide reflects current dental practices and economic factors, making it an essential resource for anyone seeking dental care in the province.

Understanding the Purpose of the Dental Fee Guide

The Dental Fee Guide Alberta 2023 serves as a reference for standardizing dental procedure costs, ensuring transparency and fairness for patients.

It provides a baseline for dentists to set their fees, reflecting the complexity and materials required for each procedure.

The guide helps patients understand expected costs, fostering informed decision-making and trust in dental care services.

By outlining suggested fees, it promotes consistency across Alberta, enabling patients to compare services and budgets effectively.

This resource is invaluable for both patients and dentists, ensuring clear communication and alignment on treatment costs and expectations.

Key Features of the 2023 Edition

The 2023 Alberta Dental Fee Guide includes updated pricing for common procedures, reflecting current dental practices and economic factors.

It features a user-friendly format, making it easier for patients and dentists to reference and understand procedure costs;

The guide highlights an 8.5% reduction in fees for the most common procedures compared to 2016 rates, ensuring affordability.

It also emphasizes transparency, allowing patients to compare fees and make informed decisions about their dental care.

This edition provides clarity on specialist fees, which are reimbursed at general practitioner rates, and includes details on pre-authorization processes for insurance.

Overall, the 2023 guide is a vital tool for budgeting and planning dental treatments effectively.

How the Guide Helps Patients and Dentists

The Alberta Dental Fee Guide 2023 empowers patients by providing clear, standardized pricing, enabling them to budget and make informed decisions about their care.

It helps dentists by offering a reference for setting competitive and fair fees, ensuring consistency across the province.

The guide fosters transparency, reducing misunderstandings and building trust between patients and dental professionals.

By aligning expectations, it simplifies discussions about treatment costs and insurance coverage, benefiting both parties.

This resource is essential for promoting accessibility and affordability in dental services throughout Alberta.

Importance of the Dental Fee Guide

The Alberta Dental Fee Guide 2023 ensures fair pricing, builds trust, and aids in financial planning for patients while providing a benchmark for dentists to set competitive rates.

Transparency in Dental Pricing

The Alberta Dental Fee Guide 2023 enhances transparency by clearly outlining suggested fees for dental procedures, enabling patients to understand and compare costs effectively.

This clarity helps patients make informed decisions about their care and fosters trust between dentists and their clients.

By providing a standardized reference, the guide ensures that pricing is open and fair, reducing surprises and promoting accountability in dental billing practices across the province.

Helping Patients Budget for Dental Care

The Alberta Dental Fee Guide 2023 empowers patients to budget effectively by providing clear, standardized fee information for various dental procedures.

This resource allows individuals to estimate costs upfront, plan treatments, and avoid unexpected expenses.

By understanding typical fees, patients can discuss financial options with their dentists and make informed decisions about their care, ensuring they allocate resources wisely for their oral health needs.

Standardizing Dental Procedure Costs

The Alberta Dental Fee Guide 2023 standardizes costs for dental procedures, ensuring consistency across the province.

This uniformity helps patients compare fees and understand what to expect when receiving care.

By setting benchmarks, the guide reduces variability in pricing, fostering fairness and transparency in dental services.

This standardization also aids dentists in setting competitive rates while maintaining quality care, benefiting both practitioners and patients alike in Alberta.

Factors Influencing Dental Fees in Alberta

Dental fees in Alberta are influenced by location, dentist expertise, and materials used, ensuring transparency and fairness in pricing across the province.

Location and Regional Variations

Dental fees in Alberta vary by location, with urban areas like Calgary and Edmonton often having higher costs due to living expenses and overhead.

Rural regions may offer more affordable services, reflecting lower operational costs.

The Alberta Dental Fee Guide accounts for these regional differences, ensuring transparent pricing across the province.

This helps patients compare fees and make informed decisions based on their location and needs.

Dentist Experience and Specialty

Dental fees in Alberta can vary based on a dentist’s experience and specialization.

Specialist dentists, such as orthodontists or oral surgeons, may charge higher rates due to advanced training and expertise.

General practitioners with more experience may also set higher fees for complex procedures.

The Dental Fee Guide reflects these variations, providing a benchmark for both general and specialized dental services.

This helps patients understand potential costs and choose care that aligns with their needs and budget.

Materials and Technology Used

The cost of dental procedures in Alberta can be influenced by the materials and technology used.

High-quality materials, such as porcelain or composite resins, may increase fees for restorations like crowns or fillings.

Advanced technologies, like CAD/CAM systems for precision crowns or 3D imaging for diagnostics, also contribute to higher costs.

These factors are reflected in the Dental Fee Guide, providing patients with a clear understanding of how materials and technology impact pricing.

This transparency helps patients make informed decisions about their care.

Common Dental Procedures and Their Costs

The Dental Fee Guide lists costs for procedures like routine check-ups, fillings, crowns, bridges, dentures, root canals, and extractions, helping patients anticipate expenses accurately.

Routine Check-ups and Cleanings

Routine Check-ups and Cleanings

Routine dental check-ups and cleanings are essential for maintaining oral health. The Alberta Dental Fee Guide 2023 outlines the costs for these preventive services, ensuring transparency.

Typically, a standard cleaning and exam range between $75 to $150, depending on the dentist and location.

These procedures often include a visual exam, cleaning, and fluoride treatment, helping prevent more severe issues.

Regular check-ups are crucial for early detection of problems, saving costs in the long run.

Insurance often covers these services, making them more accessible for patients.

The guide helps patients budget for these routine visits, promoting better oral health outcomes across Alberta.

Fillings and Restorative Procedures

Fillings and restorative procedures are common treatments for tooth decay or damage. The Alberta Dental Fee Guide 2023 provides detailed pricing for these services, ensuring clarity;

Amalgam fillings typically range from $120 to $250 per tooth, while composite fillings may cost between $150 to $300, depending on complexity.

Crowns, inlays, and onlays are also listed, with costs varying based on materials and tooth location.

The guide helps patients anticipate expenses, making it easier to plan for necessary restorative care.

Insurance coverage for these procedures varies, so consulting the guide and insurers is recommended.

This transparency ensures fair pricing and informed decision-making for patients and dentists alike.

Crowns, Bridges, and Dentures

Crowns, bridges, and dentures are essential for restoring missing or damaged teeth. According to the Alberta Dental Fee Guide 2023, crowns typically range from $1,000 to $2,500 per tooth, depending on materials like ceramic or porcelain.

Bridges, which replace missing teeth, can cost between $2,000 to $5,000 per unit, varying with complexity and materials.

Dentures are priced based on type, with partial dentures starting at $600 and full sets ranging from $1,500 to $3,000.

These estimates help patients budget for restorative treatments, ensuring clarity in dental care costs.

Root Canals and Extractions

Root canals and extractions are common procedures for addressing tooth decay or damage. According to the Alberta Dental Fee Guide 2023, root canal treatments typically range from $500 to $1,400 per tooth, depending on complexity.

Tooth extractions, including wisdom teeth removal, can cost between $100 to $600, varying by difficulty and anesthesia needs.

These procedures are essential for relieving pain and preventing infection, with costs varying based on tooth location and treatment complexity.

Patients should consult their dentist for precise estimates tailored to their specific needs.

How to Use the Dental Fee Guide Effectively

Compare fees across dentists, understand insurance coverage, and discuss costs with your dentist to make informed decisions.

This guide helps you budget and plan for dental care effectively, ensuring transparency and clarity in treatment expenses.

Comparing Fees Across Dentists

Comparing fees across dentists using the Alberta Dental Fee Guide helps patients identify cost differences for procedures.

Check if your dentist adheres to the guide or adjusts fees based on location or experience.

This comparison enables informed decisions, ensuring transparency and fairness in dental care pricing.

It also highlights variations in charges, helping patients choose affordable options without compromising quality.

Discussing fees with your dentist clarifies expectations and ensures alignment with your budget and treatment needs.

Understanding Insurance Coverage

Understanding your insurance coverage is crucial for managing dental care costs. The Alberta Dental Fee Guide helps verify if treatments are covered and reimbursed.

Check annual limits and exclusions to avoid unexpected expenses. Pre-authorizations may be required for certain procedures.

Public and private insurance plans vary, so review your policy details. Knowing your coverage ensures alignment with the fee guide recommendations;

This clarity helps patients make informed decisions and avoids financial surprises during treatment.

Discussing Costs with Your Dentist

Open communication with your dentist about costs is essential for transparency and trust. Use the Dental Fee Guide as a reference to understand treatment costs and insurance coverage.

Dentists can clarify fees upfront, ensuring you know the breakdown of costs and any out-of-pocket expenses not covered by insurance.

This discussion helps you make informed decisions and avoid financial surprises, ensuring your care aligns with your budget and expectations.

Dental Insurance and Coverage in Alberta

Dental insurance in Alberta offers public and private options, with coverage varying based on plans. The Alberta Dental Fee Guide helps determine reimbursable fees, ensuring transparency for patients and providers.

Public vs. Private Insurance Options

Public and private dental insurance options in Alberta cater to different needs. Public plans, like those for children and low-income individuals, cover essential procedures. Private plans offer broader coverage, including cosmetic and major procedures, but at higher costs. Public insurance is often limited to preventive care, while private plans provide more flexibility. Both options have annual limits and exclusions, with reimbursement based on the Alberta Dental Fee Guide. Understanding these differences helps individuals choose the best coverage for their dental needs and budget.

Annual Limits and Exclusions

Annual limits and exclusions in dental insurance plans vary, with most plans capping reimbursement at a specific amount per year. These limits help control costs but may restrict coverage for extensive treatments. Exclusions, such as certain cosmetic procedures, are common and outlined in policy terms. Patients should review their insurance details to understand what is covered and what is excluded, ensuring they budget accordingly for out-of-pocket expenses. This awareness helps prevent financial surprises and aligns expectations with available benefits under the Alberta Dental Fee Guide.

Pre-Authorization Processes

Pre-authorization is a process where dental treatments are reviewed by insurance providers to determine coverage eligibility and reimbursement amounts. Patients and dentists can submit treatment plans to insurance companies for approval before proceeding with procedures. This step ensures clarity on what is covered and helps avoid unexpected costs. Pre-authorization is particularly important for complex or high-cost treatments, as it confirms the extent of insurance support. It streamlines communication between patients, dentists, and insurers, reducing financial uncertainties and ensuring smoother treatment planning under the Alberta Dental Fee Guide.

The Alberta Dental Fee Guide 2023 is a vital resource for transparent pricing, helping patients budget and understand treatment costs while fostering clear communication with dentists.

Final Thoughts on the Dental Fee Guide

The Alberta Dental Fee Guide 2023 serves as a crucial tool for transparency, enabling patients to understand and budget for dental care effectively. By standardizing procedure costs, it ensures fair pricing across the province, fostering trust between patients and dentists. The guide’s annual updates reflect current dental practices and economic changes, making it a reliable resource for informed decision-making. It empowers patients to seek affordable care while guiding dental professionals in pricing their services competitively.

Encouraging Open Communication

The Alberta Dental Fee Guide 2023 promotes open dialogue between patients and dentists by providing clear, standardized fee information. This transparency enables patients to ask informed questions about costs and treatments, fostering trust. Dentists can use the guide to explain procedure fees and ensure patients understand their options. Encouraging such communication helps patients feel empowered and confident in their care decisions, while dentists can maintain a patient-centric approach. It also ensures both parties are aligned on expectations and financial responsibilities.

Planning for Future Dental Care

The Alberta Dental Fee Guide 2023 aids in planning future dental care by providing clear cost estimates for procedures; Patients can budget effectively for upcoming treatments, ensuring they allocate resources wisely. Understanding expected fees helps individuals prioritize care and avoid financial surprises. This guide also enables discussions with dentists about long-term oral health goals, fostering proactive planning. By aligning financial preparation with dental needs, patients can maintain optimal oral health while managing expenses efficiently.

Bybeatrice

humanscale m8.1 dual monitor manual

The Humanscale M8.1 Dual Monitor Manual is a comprehensive guide for installing and configuring the M8.1 monitor arm, designed to enhance workplace ergonomics and productivity. It covers compatibility, installation steps, and troubleshooting for optimal dual-monitor setups, ensuring a seamless and efficient workspace experience.

Overview of the M8.1 Monitor Arm

The Humanscale M8.1 Monitor Arm is a versatile and ergonomic solution designed to support single or dual monitors, ensuring optimal workspace comfort. It features a robust weight capacity of 6-28 lbs for single monitors and up to 12.5 lbs per monitor for dual setups. With an optional crossbar, it accommodates two monitors seamlessly, while its sleek design integrates with traditional desks or sit/stand workstations. The M8.1 is built for durability and flexibility, offering a wide range of configurations to meet diverse workspace needs, making it a top choice for enhancing productivity and ergonomic comfort.

Importance of Proper Installation

Proper installation of the Humanscale M8.1 Monitor Arm is crucial for ensuring stability, safety, and optimal functionality. Incorrect installation can lead to monitor misalignment, instability, or even damage to the arm or monitors. Following the manual’s guidelines ensures the arm is securely mounted, cables are neatly managed, and weight limits are respected. Proper setup also maximizes ergonomic benefits, such as customizable height and angle adjustments, promoting a comfortable and productive workspace. Adhering to installation instructions helps maintain the product’s durability and performance, ensuring long-term satisfaction and efficiency in your workspace.

Key Features of the Humanscale M8.1 Dual Monitor Arm

The Humanscale M8.1 offers ergonomic design, compatibility with sit/stand workstations, and supports up to 28 lbs for single monitors or 12.5 lbs each for dual setups.

Weight Capacity and Monitor Compatibility

The Humanscale M8.1 is designed to accommodate a wide range of monitor sizes and weights. For single-monitor setups, it supports up to 28 lbs (12.7 kg), while dual-monitor configurations allow up to 12.5 lbs (5.6 kg) per monitor. This ensures compatibility with most modern monitors, providing stability and balance. The arm is compatible with VESA mounting standards, making it versatile for various monitor brands and sizes. Its robust construction and weight-compensating spring technology ensure smooth adjustment and long-term durability, catering to both small and large screens seamlessly.

Adjustability and Ergonomic Design

The Humanscale M8.1 features an ergonomic design that prioritizes comfort and flexibility. With a wide range of motion, it allows users to position their monitors at optimal viewing angles, promoting better posture and reducing eye strain. The arm’s height adjustment range of 290mm and 560mm reach ensure monitors can be placed precisely for individual preferences. Smart Stop technology prevents the arm from over-extending, while the weight-compensating spring provides effortless monitor movement. These features create a tailored workspace, enhancing productivity and user well-being. Its sleek design integrates seamlessly into any office environment, maintaining a clutter-free aesthetic.

Installation Process for the M8.1 Dual Monitor Setup

The M8.1 installation involves attaching the mount, using hex keys for adjustments, and routing cables through management clips. Dual-monitor setups require crossbar installation for proper alignment and stability.

Preparing the Necessary Tools and Hardware

To ensure a smooth installation, gather the required tools and hardware. These include a 4mm hex key (Hex Key A) for tightening screws, a 5mm hex key (Hex Key B) for adjusting the arm, and a clamp mount for securing the base. Additionally, you’ll need VESA bracket screws, crossbar link screws, and plastic spacers. For dual-monitor setups, the crossbar and cable management clips are essential. Ensure all components are included in the package and refer to the manual for specific hardware requirements. Proper preparation ensures stability and alignment during assembly.

Step-by-Step Assembly and Mounting

Begin by attaching the mount to your work surface using the provided clamp or bolt-through hardware. Insert the M8 arm into the base stem and secure it with Hex Key A. For dual-monitor setups, attach the crossbar to the arm using the crossbar link screws. Tighten all connections firmly to ensure stability. Route monitor cables through the cable management clips to maintain a clean setup. Align the VESA brackets with your monitors and secure them to the arm or crossbar. Use Hex Key B to fine-tune the height and alignment of your monitors for optimal ergonomics.

Configuring the Dual Monitor Crossbar

To configure the dual monitor crossbar, first attach it to the M8.1 arm using the crossbar link screws. Ensure the crossbar is securely fastened to support the weight of both monitors. Use Hex Key B to adjust the height of the crossbar, aligning it to your desired ergonomic setup. Route the monitor cables through the cable management clips on the crossbar to keep the workspace organized. Once the crossbar is in place, attach the VESA brackets to your monitors and mount them onto the crossbar. Fine-tune the alignment and balance to achieve a comfortable viewing position for both screens.

Cable Management and Organization

Effective cable management ensures a clutter-free workspace. Use cable management clips on the crossbar to route monitor cables neatly. This enhances productivity and safety by preventing tangles and tripping hazards.

Routing Cables for a Clean Setup

Proper cable routing is essential for a clutter-free workspace. Begin by threading monitor cables through the cable management clips located on the front of the crossbar. For dual-monitor setups, ensure both cables are securely routed through their respective clips to maintain organization. Use the provided Hex Key B to adjust the height of your monitors, ensuring cables are not overly taut or slack. Once cables are routed, tighten any adjustable clips to keep them in place. This method prevents tangles, reduces wear on cables, and enhances the overall aesthetics of your workspace. Regularly inspect and re-route cables as needed to maintain a clean setup.

Using Cable Management Clips

The Humanscale M8.1 includes cable management clips to streamline your workspace. These clips, located on the front of the crossbar, allow you to neatly route and secure monitor cables. For dual-monitor setups, route each cable through its respective clip to prevent tangles and maintain organization. Once cables are in place, use the provided Hex Key B to adjust the clips, ensuring a snug fit. This system keeps your workspace clutter-free, enhances aesthetics, and protects cables from damage. Regularly check and tighten the clips to maintain optimal cable organization and ensure long-term durability.

Troubleshooting Common Issues

Address common issues like monitor misalignment or arm instability by checking the tightness of all bolts and ensuring the crossbar is properly secured. Adjust the tension using the Hex Key for smooth movement and balance. If problems persist, refer to the manual for detailed solutions or contact support for assistance.

Addressing Monitor Misalignment

Monitor misalignment can disrupt your workflow. To fix this, use the Hex Key to adjust the crossbar’s height and ensure both monitors are level. If screens are uneven, check the tightness of the crossbar link screws and re-tighten if necessary. Make sure the VESA brackets are securely attached to the monitors and aligned with the arm’s pivot points. For precise alignment, refer to the manual’s step-by-step guide. Proper adjustment ensures ergonomic comfort and optimal screen positioning, enhancing your overall workspace efficiency and productivity.

Adjusting Tension for Smooth Movement

To ensure smooth movement of the M8.1 monitor arm, proper tension adjustment is crucial. Using the provided Hex Key, tighten or loosen the tension screws located at the joint of the arm. For dual-monitor setups, ensure both arms have balanced tension to maintain stability. If the arms feel too loose or stiff, adjust the screws gradually until the desired movement is achieved. Over-tightening can restrict motion, while under-tightening may cause instability. Refer to the manual for precise torque specifications. Proper tension adjustment ensures seamless height and angle adjustments, enhancing the arm’s performance and longevity.

Maintenance and Care Tips

Regularly clean the M8.1 arm with a soft cloth and avoid harsh chemicals. Periodically inspect bolts and cables for tightness. Proper care ensures long-term durability and smooth operation.

Cleaning the Monitor Arm

Regular cleaning of the Humanscale M8.1 monitor arm is essential for maintaining its functionality and appearance. Use a soft, dry cloth to wipe down the arm, joints, and springs. Avoid harsh chemicals, abrasive cleaners, or liquids, as they may damage the finish or components. For stubborn dirt, a slightly damp cloth can be used, but ensure the arm is dry afterward. Clean the cable management clips and crossbar to prevent dust buildup. Never spray cleaning products directly on the arm; instead, apply them to the cloth first. Proper cleaning ensures smooth operation and longevity of the product.

Ensuring Long-Term Durability

To maintain the Humanscale M8.1 monitor arm’s longevity, regular inspections of springs, joints, and bolts are crucial. Ensure proper weight distribution across the arm, avoiding overloading beyond the specified limits (6-28 lbs for single monitors and 12.5 lbs per monitor for dual setups). Periodically check and tighten loose screws, especially around the VESA brackets and crossbar connections. Refer to the manual for recommended maintenance and adjustment procedures. By following these steps, you can ensure the arm remains stable, functional, and durable, providing years of reliable service in your workspace.

The Humanscale M8.1 Dual Monitor Manual provides a comprehensive guide for optimal setup, ensuring enhanced productivity and comfort. Proper installation and maintenance guarantee long-term satisfaction and durability.

Final Checklist for Optimal Setup

  • Ensure the total weight of monitors is within the 6-28 lbs range for single or dual setups.
  • Route cables through management clips for a clean and organized workspace.
  • Adjust monitor height and alignment using Hex Key B for dual configurations.
  • Secure the crossbar and arm connections tightly to prevent movement.
  • Verify VESA compatibility and proper bracket installation.
  • Test smooth arm movement and tension adjustments for optimal ergonomics.
  • Double-check all hardware is securely fastened for long-term durability.
Bybeatrice

2024 frc manual

2024 FRC Manual Overview

The 2024 FRC Game Manual serves as the official guide for teams, outlining rules, gameplay specifics, and equipment standards for the competition. It provides essential resources, ensuring clarity and fairness for all participants; Updated annually, the manual reflects the latest changes and innovations in the FIRST Robotics Competition.

The 2024 FRC Game Manual is the official guide for teams participating in the FIRST Robotics Competition (FRC). Released during the 2024 FRC Kickoff on January 6, 2024, this document provides detailed rules, gameplay specifics, and technical requirements. It serves as the primary resource for teams to understand the competition format, scoring systems, and field layouts. The manual is available in English as a PDF and has been translated into other languages for global accessibility. It outlines expectations for team conduct, safety protocols, and event procedures, ensuring a fair and structured environment for all participants. Teams are encouraged to review the manual thoroughly to prepare for the competition effectively.

Key Changes from Previous Seasons

The 2024 FRC Game Manual introduces several key changes to enhance gameplay and team experience. This season, the manual incorporates event-specific materials, streamlining resources for teams. Additionally, the double elimination bracket format has been updated, as highlighted in Diagram 6. The FRC Nexus application is being piloted at the Championship Event, marking a digital shift in competition management. Rules and updates are now more accessible, with encrypted materials available online, including field drawings and team updates. These changes aim to improve clarity, efficiency, and fairness, ensuring a smooth transition for teams adapting to the new season’s requirements. The manual reflects FIRST’s commitment to innovation and continuous improvement in the competition.

2024 FRC Event Details

The 2024 FIRST Robotics Competition kicked off on January 6, 2024, with a detailed presentation outlining the season’s structure and schedule. The event introduced the FRC Nexus application, a digital platform enhancing team and event management. This year’s competition features streamlined resources, including encrypted materials and updated field drawings, ensuring teams are well-prepared for the challenges ahead. The event details emphasize innovation, efficiency, and accessibility, setting the stage for an exciting season.

2024 FIRST Robotics Competition Kickoff Presentation

The 2024 FIRST Robotics Competition Kickoff Presentation was held on January 6, 2024, marking the official start of the season. This event introduced the new game, its rules, and the updated Game Manual. Teams globally tuned in to watch the presentation, which detailed gameplay specifics, field layout, and scoring systems. The kickoff also highlighted the introduction of the FRC Nexus application, a digital platform designed to enhance team and event management. Additionally, encrypted game materials, including field drawings and team updates, were made available to participants. The presentation emphasized the importance of innovation, collaboration, and sportsmanship, setting the tone for an exciting and competitive season. All resources, including the English PDF version of the manual, were distributed to ensure teams were well-equipped for the challenges ahead.

Event Structure and Schedule

The 2024 FIRST Robotics Competition (FRC) event structure follows a well-defined schedule, ensuring a smooth progression for teams throughout the season. The season officially begins with the Kickoff Presentation on January 6, 2024, where the game is revealed. Teams then have six weeks to design, build, and test their robots. Regional events are held from February to April, allowing teams to compete and earn qualifications for the Championship. The Championship, scheduled for April 24-27, 2024, features a double elimination bracket, ensuring exciting and competitive finals. The event structure emphasizes fair play, innovation, and teamwork, with clear guidelines outlined in the Game Manual to ensure a consistent experience for all participants.

2024 FRC Game Rules

The 2024 FRC Game Manual serves as the official guide for competition rules, outlining gameplay specifics, scoring systems, and penalties. It ensures fair play and clarity for all teams.

Gameplay Specifics and Scoring System

The 2024 FRC Game Manual details gameplay specifics, including autonomous and teleoperated periods, with scoring based on tasks like objective completion and alliance cooperation. Points are awarded for achieving specific goals, such as scoring cargo, climbing, or balancing. The manual outlines penalties for violations, ensuring fair competition. Teams earn bonus points for strategic actions, with tiebreakers determined by predefined criteria. The scoring system emphasizes efficiency and precision, encouraging innovative robot designs and teamwork. Updates from previous seasons refine gameplay mechanics, enhancing clarity and excitement for participants and spectators alike. The manual ensures all rules are clear, enabling teams to strategize effectively.

Field Layout and Equipment Specifications

The 2024 FRC Game Manual provides detailed field layout and equipment specifications, ensuring consistency and fairness across all competitions. The field design supports various gameplay phases, with specific zones and obstacles. Equipment specifications outline materials, dimensions, and safety standards for robots and field components. Teams must adhere to these guidelines to ensure eligibility and performance. The manual includes diagrams and measurements for critical elements, such as the playing field, alliance stations, and scoring areas. Updates from previous seasons refine equipment rules, enhancing safety and gameplay. The field layout is designed to accommodate dynamic interactions, encouraging strategic robot design and operation. These specifications ensure a balanced and competitive environment for all teams.

2024 FRC Team Resources

The 2024 FRC Game Manual and related materials, including field drawings and team updates, are accessible to all teams. Regular updates and official communications ensure teams stay informed and compliant with competition requirements.

Accessing the 2024 Game Manual and Related Materials

Teams can access the 2024 FRC Game Manual and related resources through the official FIRST Robotics Competition website. The manual is available in PDF format, ensuring easy access for all participants. Additional materials, such as field drawings, diagrams, and team updates, are also provided to support team preparation. The manual is regularly updated, and teams are encouraged to check for the latest version. Translations in multiple languages, including Spanish, French, Turkish, and Chinese, are available for international teams. Access to these resources is granted upon team registration, ensuring a smooth and informed start to the competition season. These materials are essential for understanding game rules, field specifications, and event guidelines, helping teams prepare effectively for the challenges ahead. By providing comprehensive and accessible resources, FIRST ensures all teams have the tools needed to succeed in the competition. The centralized distribution of materials also helps maintain consistency and fairness across all participating teams. For any questions or clarifications, teams can reach out to the FIRST Robotics Competition Team Advocate for support. The manual and related materials are designed to be user-friendly, allowing teams to focus on strategy, design, and innovation without unnecessary obstacles. Through these resources, FIRST fosters a collaborative and competitive environment that encourages learning and creativity among participants. Regular updates and clear communication ensure that all teams are well-informed and prepared for the upcoming events. The availability of these materials underscores FIRST’s commitment to providing a robust and supportive framework for all teams involved in the competition. By leveraging these resources, teams can maximize their potential and contribute to the exciting and dynamic nature of the FIRST Robotics Competition. The 2024 season promises to be an engaging and challenging experience, and having access to the right materials is key to success. Teams are encouraged to utilize these resources fully to gain a competitive edge while adhering to the rules and guidelines set forth by FIRST. The distribution of these materials reflects the organization’s dedication to fostering innovation and teamwork on a global scale. As the competition progresses, teams will rely on these resources to refine their strategies and achieve their goals. The accessibility of the manual and related materials ensures that every team, regardless of experience or location, has the opportunity to excel in the competition. By providing a wealth of information in a clear and organized manner, FIRST empowers teams to focus on what truly matters—building innovative robots and developing essential skills for the future. The 2024 FRC Game Manual and related materials are indispensable tools for any team aiming to make a meaningful impact in the competition. Through these resources, teams can navigate the challenges of the season with confidence and precision, ensuring a successful and rewarding experience for all participants. The detailed and comprehensive nature of the materials underscores the importance of preparation and adherence to guidelines, which are critical to the integrity and enjoyment of the competition. As teams delve into the resources, they will find everything needed to understand and excel in the 2024 FIRST Robotics Competition. The availability of these materials in multiple formats and languages further emphasizes FIRST’s commitment to inclusivity and accessibility, ensuring that all teams have an equal opportunity to thrive. By leveraging these resources effectively, teams can enhance their performance, foster collaboration, and contribute to the vibrant community that defines the FIRST Robotics Competition. The 2024 season is poised to be one of the most exciting yet, and having access to the right materials is essential for teams to reach their full potential. Through the Game Manual and related resources, FIRST continues to set the standard for excellence in robotics competitions, inspiring students to pursue careers in science, technology, engineering, and mathematics. The distribution of these materials is a testament to the organization’s dedication to providing a comprehensive and supportive environment for all participants. As teams prepare for the challenges ahead, they can rely on these resources to guide them every step of the way, ensuring a successful and memorable experience in the 2024 FIRST Robotics Competition.

Team Updates and Official Communications

Official communications and team updates for the 2024 FRC season are distributed through various channels, ensuring teams stay informed. The FIRST Robotics Competition provides updates via email, the FRC Nexus application, and the official website. Teams are encouraged to regularly check these sources for the latest information, rule clarifications, and event details. Communication is also facilitated through multilingual support, catering to teams worldwide. Additionally, the FRC Team Advocate is available to address questions and concerns. Teams must adhere to all official communications to ensure compliance with rules and event guidelines. Staying informed is crucial for success, as updates often contain vital details about gameplay, scheduling, and logistics. By maintaining open lines of communication, FIRST ensures a fair and enjoyable experience for all participants. Teams are responsible for monitoring these updates to stay competitive and compliant throughout the season. Regular engagement with official communications helps teams navigate the competition effectively and make informed decisions. This structured approach to communication underscores FIRST’s commitment to transparency and organization, benefiting all teams involved in the 2024 FRC season.

2024 FRC Digital Platform

The FRC Nexus is a web-based application developed by Evan, piloted at the 2024 Championship. It enhances team and event management, streamlining communication and operations.

The FRC Nexus application is a web-based platform developed to enhance the FIRST Robotics Competition experience. Designed by Evan, it was piloted at the 2024 Championship, offering teams and event organizers a centralized hub for real-time scoring, scheduling, and team management. Nexus streamlines communication, reduces paperwork, and provides seamless access to critical competition data. Features include live updates, match tracking, and integrated tools for data analytics. This innovative platform aims to improve operational efficiency and elevate the overall competition experience. While still in its pilot phase, Nexus is poised to become a cornerstone of FRC operations, supporting teams and organizers alike in future seasons.

2024 FRC Championship Details

The 2024 FIRST Robotics Competition Championship promises to be an exciting culmination of the season, bringing together over 600 qualifying teams. Hosted by BAE Systems, it will celebrate student innovation and teamwork on a grand scale. The event features high-intensity matches, showcasing robots designed and built by students from around the world. Teams will compete in a double elimination bracket, with the championship winners earning prestigious awards and recognition. The championship also includes ceremonies, workshops, and opportunities for networking. As a premier event, it highlights the impact of STEM education and the dedication of FIRST Robotics teams. This year’s championship is a celebration of creativity, engineering, and collaboration.

Bybeatrice

aashto manual for bridge evaluation

The AASHTO Manual for Bridge Evaluation is a comprehensive guide for bridge inspection and evaluation, designed to assist engineers and agencies in ensuring bridge safety and structural integrity․

1․1 Overview of the Manual

The AASHTO Manual for Bridge Evaluation provides detailed guidelines for assessing bridge conditions, ensuring safety, and optimizing maintenance․ It includes updated interim revisions, such as the 2023 interims, and aligns with federal regulations like 23 CFR 650․317(a)․ The manual addresses key topics like load rating, fatigue evaluation, and special provisions for equipment․ It reflects collaboration efforts, such as the AASHTO/NSBA Steel Bridge Collaboration, and is designed for use by state DOTs and inspection agencies to meet National Bridge Inspection Standards․

1․2 Importance of Bridge Evaluation

Bridge evaluation is critical for ensuring public safety, maintaining structural integrity, and extending the lifespan of bridges․ It helps identify potential issues before they become critical, protecting infrastructure and preventing costly repairs․ By adhering to the AASHTO Manual, engineers can systematically assess bridges, ensuring compliance with federal regulations and national standards․ This process safeguards public safety and supports the economic vitality of communities by maintaining reliable transportation networks and minimizing disruptions․

History and Evolution of the AASHTO Manual

The AASHTO Manual for Bridge Evaluation was first published in 2017, with updates in 2023 to reflect advancements in bridge inspection and evaluation practices․

2․1 Development and Publication Timeline

The AASHTO Manual for Bridge Evaluation was first published in 2017, with interim revisions added in 2019, 2020, and 2022․ The 2023 edition incorporates updates to concrete shear and fatigue evaluation, reflecting advancements in bridge inspection practices․ Collaboration with the NSBA and federal regulations ensures alignment with national bridge inspection standards․ The manual is regularly updated to address emerging challenges and technologies, making it a critical resource for bridge owners and engineers․ Its evolution underscores AASHTO’s commitment to improving bridge safety and structural integrity․

2․2 Key Editions and Updates

The AASHTO Manual for Bridge Evaluation has undergone significant updates, with the 3rd Edition incorporating 2022 and 2023 interim revisions․ Key updates include changes to concrete shear and fatigue evaluation, as outlined in sections like MBE 6A․5․8․ These revisions reflect advancements in bridge inspection practices and alignment with federal regulations․ Collaboration with the NSBA has also enhanced the manual’s content․ Each edition aims to improve bridge safety and structural integrity, ensuring compliance with national standards and addressing emerging challenges in bridge design and maintenance․

Key Features and Updates in the 2023 Edition

The 2023 edition introduces interim revisions, updates to concrete shear and fatigue evaluation, and enhanced collaboration with NSBA, ensuring alignment with modern bridge assessment standards and practices․

3․1 Interim Revisions for 2023

The 2023 interim revisions to the AASHTO Manual for Bridge Evaluation include updates to concrete shear and fatigue evaluation, reflecting advances in engineering practices․ These revisions aim to enhance the accuracy of bridge assessments and ensure compliance with current safety standards․ Key changes, such as those in sections MBE 6A․5․8 and MBE 6A․4․2․1, address specific technical requirements for evaluating bridge structures․ The updates are designed to support bridge owners and engineers in making informed decisions about maintenance and rehabilitation, aligning with federal regulations and national bridge inspection standards․

3․2 Changes to Concrete Shear and Fatigue Evaluation

The 2023 updates include significant revisions to concrete shear and fatigue evaluation methodologies, enhancing assessment accuracy․ Changes in sections like MBE 6A․5․8 address shear strength calculations, incorporating updated design formulas․ Fatigue evaluation now considers long-term stress cycles, improving durability predictions․ These updates reflect advances in material science and structural analysis, enabling more precise identification of potential weaknesses․ The revisions support safer bridge structures by aligning evaluation practices with current engineering knowledge and field observations․

Technical Guidelines and Specifications

The manual provides detailed technical guidelines for bridge evaluation, including load rating, fatigue assessment, and special provisions, ensuring safe and compliant bridge inspection practices nationwide․

4․1 Load Rating and Fatigue Evaluation

Load rating and fatigue evaluation are critical components of bridge assessment, ensuring structures can safely withstand traffic and environmental stresses․ The 2023 AASHTO Manual updates include enhanced methodologies for concrete shear and fatigue analysis, addressing long-term durability․ These revisions align with federal regulations and provide standardized procedures for engineers to evaluate bridge capacity accurately․ The implementation of these guidelines in bridge design software, such as BrDR 7․5, streamlines the process, ensuring compliance and reliability in bridge safety assessments nationwide․

4․2 Special Provisions and Equipment Requirements

Special provisions and equipment requirements in the AASHTO Manual ensure safe and accurate bridge inspections; Section 4․2 highlights the necessity of adhering to specific guidelines for equipment usage, including calibrated tools and safety gear․ These provisions are designed to mitigate risks during evaluations and maintain structural integrity․ Updates in the 2023 edition emphasize compliance with federal regulations, such as 23 CFR 650․317(a), ensuring alignment with national safety standards․ Proper equipment and adherence to these provisions are critical for reliable bridge assessment outcomes․

Collaboration and Implementation

The AASHTO Manual for Bridge Evaluation fosters collaboration between state DOTs, NSBA, and industry experts, ensuring updated standards are implemented efficiently in bridge design and inspection software․

5․1 AASHTO/NSBA Steel Bridge Collaboration

The AASHTO/NSBA collaboration focuses on advancing steel bridge design and evaluation standards․ This partnership ensures harmonized guidelines for load rating, fatigue assessment, and material specifications․Joint efforts prioritize updating inspection procedures and incorporating the latest research into the manual․ The 2023 updates reflect this collaboration, with revisions to concrete shear evaluation and alignment with federal regulations․ This teamwork enhances the manual’s practicality for engineers and state DOTs, ensuring safer and more durable steel bridges․

5․2 Implementation of Updates in Bridge Design Software

The 2023 AASHTO Manual updates are integrated into bridge design software, ensuring engineers apply the latest guidelines․ Tools like BrDR 7․5 incorporate interim revisions, including changes to concrete shear evaluation․ The AASHTOWare Bridge Rating (BrR) Analysis Engine aligns with these updates, enabling accurate load ratings and fatigue assessments․ Software implementation streamlines compliance with federal regulations and national bridge inspection standards, enhancing efficiency and accuracy for bridge design and evaluation professionals․

Roles and Responsibilities

Bridge owners and inspection agencies are responsible for ensuring compliance with evaluation standards․ Consultant firms and training instructors play key roles in implementing updates and providing expertise to state DOTs․

6․1 Bridge Owners and Inspection Agencies

Bridge owners and inspection agencies are responsible for ensuring the safety and structural integrity of bridges․ They must comply with evaluation standards, perform regular inspections, and maintain accurate records․ These entities are tasked with identifying deficiencies and prioritizing repairs․ Inspection agencies must adhere to the National Bridge Inspection Standards and use the AASHTO manual as a primary reference․ Their role includes evaluating bridge conditions, applying load ratings, and ensuring compliance with federal regulations․ Proper documentation and reporting are critical to maintain public safety and extend bridge service life effectively․

6․2 Consultant Inspection Firms and Training Instructors

Consultant inspection firms and training instructors play a vital role in implementing the AASHTO Manual for Bridge Evaluation․ These professionals provide expertise in evaluating bridge structures, ensuring compliance with the manual’s guidelines․ Training instructors educate engineers and inspectors on the latest methodologies and updates, such as the 2023 interim revisions․ Consultant firms often collaborate with state DOTs to conduct detailed inspections and load ratings, while instructors focus on practical application and software tools like AASHTOware․ Their work ensures consistency, accuracy, and adherence to national bridge inspection standards, ultimately enhancing bridge safety and durability․

Compliance and Regulatory References

The AASHTO Manual for Bridge Evaluation is incorporated by reference in federal regulations, ensuring compliance with National Bridge Inspection Standards for safe, durable bridges nationally․

7․1 Incorporation by Reference in Federal Regulations

The AASHTO Manual for Bridge Evaluation is incorporated by reference in federal regulations, specifically 23 CFR 650․317(a), ensuring compliance with national standards for bridge safety and inspection․ This incorporation mandates that bridge owners and inspection agencies adhere to the manual’s guidelines, promoting consistency and uniformity in evaluation practices across state and federal jurisdictions․ The manual’s provisions are thereby recognized as authoritative, enabling effective implementation of the National Bridge Inspection Standards and fostering reliable bridge management nationwide․

7․2 Alignment with National Bridge Inspection Standards

The AASHTO Manual for Bridge Evaluation aligns with the National Bridge Inspection Standards, ensuring consistent and reliable bridge evaluations nationwide․ It establishes uniform procedures for inspections, condition assessments, and load ratings, enabling compliance with federal requirements․ The manual incorporates guidelines for documentation, data collection, and reporting, facilitating accurate and standardized evaluations․ This alignment promotes safer bridges, supports maintenance planning, and helps bridge owners meet regulatory obligations effectively․

Future Directions and Expected Changes

The AASHTO Manual for Bridge Evaluation will continue to evolve, with future editions incorporating advanced technologies and updated guidelines for emerging bridge evaluation and inspection needs․

8․1 Forthcoming Revisions and Editions

The AASHTO Manual for Bridge Evaluation is expected to release its 10th Edition, incorporating updates from 2021, 2022, and 2023 ballots․ Future revisions will focus on integrating advanced technologies, such as improved load rating methods and updated inspection protocols․ The manual will align with the latest National Bridge Inspection Standards, ensuring compliance and safety․ Additionally, the 2023 interim revisions will be fully incorporated into the next edition, addressing concrete shear and fatigue evaluation enhancements․ These updates aim to provide a comprehensive framework for modern bridge evaluation practices․

8․2 Impact of Technological Advancements

Technological advancements are transforming bridge evaluation practices, with tools like BrDR 7․5 and AASHTOWare Bridge Rating implementing 2023 interim updates․ These technologies enhance load rating accuracy and streamline inspection processes․ The AASHTO Manual now integrates advanced analysis engines, improving fatigue and shear evaluation․ Software updates enable real-time data syncing and automated reporting, reducing errors and increasing efficiency․ These innovations ensure bridge evaluations align with modern engineering standards, fostering safer and more durable infrastructure․ Future updates will likely expand these capabilities further, driving continuous improvement in bridge assessment methodologies․

Bybeatrice

indoor plant care guide pdf

Discover the essentials of nurturing indoor plants with a comprehensive indoor plant care guide PDF. Learn light, water, and temperature tips to keep your plants thriving year-round.

Overview of Indoor Plant Care

Indoor plant care involves understanding light, water, temperature, and humidity needs. Most plants thrive in 65–75°F daytime temps and 10°F cooler at night. Water thoroughly, allowing soil to dry slightly between sessions. Fertilize during growth seasons, and observe leaf health for signs of stress. Group plants to boost humidity or use humidifiers for tropical species. Regular pruning and repotting promote healthy growth and prevent root bound issues. Proper care ensures vibrant, thriving indoor greens.

Understanding Your Plant’s Needs

Understanding your plant’s needs is crucial for their survival. Each plant requires specific light, water, and temperature conditions; Observing leaf health helps detect stress early, ensuring optimal growth.

Light Requirements for Indoor Plants

Assess your space’s light conditions to place plants appropriately. Low-light plants like Chinese Evergreen thrive in shaded areas, while bright-light plants such as Fiddle Leaf Fig require direct sunlight. Rotate plants regularly for even growth and avoid drastic light changes. Use sheer curtains to filter intense sunlight for medium-light plants like Snake Plant. Proper light placement ensures vibrant foliage and healthy development.

Watering Indoor Plants

Water indoor plants by soaking the soil thoroughly until water drains from the pot. Avoid overwatering, as it can lead to root rot. Check soil moisture by inserting a finger or chopstick. Reduce watering in winter when plants are dormant. Use room-temperature water to prevent shocking roots. Water low-maintenance plants like succulents sparingly, ensuring soil dries between sessions for optimal health.

Temperature and Humidity for Optimal Growth

Most indoor plants thrive in temperatures between 65–75°F during the day and 5–10°F cooler at night. Maintain consistent humidity, especially for tropical plants, by using humidifiers or grouping plants together. Avoid placing plants near heating vents or drafty areas to prevent stress. Proper temperature and humidity balance ensure robust growth and vibrant foliage.

Choosing the Right Plants for Your Space

Selecting plants that match your space’s light, temperature, and humidity ensures success. Opt for low-maintenance varieties like snake plants or pothos for beginners.

Low-Maintenance Plants for Beginners

Start with hardy, forgiving plants like snake plants, pothos, or ZZ plants. These thrive in low-light conditions, require infrequent watering, and tolerate neglect. Spider plants and succulents are also great for newcomers. They purify the air, grow slowly, and adapt to indoor environments. Perfect for busy schedules, these plants are ideal for building confidence and developing your green thumb.

Selecting Plants Based on Light Conditions

Choose plants that match your space’s light conditions. Low-light areas suit Chinese Evergreen or Pothos, while medium-light spaces thrive with Dracaena or Philodendron. Bright, indirect light is ideal for Bamboo Palms or Bird of Paradise. Assess your room’s light intensity and select plants accordingly to ensure optimal growth and satisfaction. Proper placement enhances both plant health and interior aesthetics.

Soil and Fertilization

Use high-quality potting soil with good drainage and organic matter. Fertilize with a balanced formula during the growing season, avoiding over-fertilization that can harm plants.

Best Potting Soil for Indoor Plants

Choose a high-quality potting soil with good drainage and organic matter. Look for mixes containing peat moss or coconut coir for moisture retention, perlite or vermiculite for aeration, and balanced pH levels. Avoid garden soil, as it can compact and prevent proper drainage. Ensure the soil is specifically designed for indoor plants to promote healthy root growth and nutrient absorption.

Fertilizing Your Indoor Plants

Fertilizing indoor plants is essential for their growth and health. Use a balanced, water-soluble fertilizer during the growing season (spring and summer). Dilute the fertilizer to half the recommended strength to avoid burning roots. Apply monthly, but avoid fertilizing during fall and winter when plants are dormant. Over-fertilizing can harm plants, so follow instructions carefully. Organic options like compost tea can also enhance soil fertility and plant health.

Potting and Repotting

Choose the right pot size and fresh potting soil for healthy root growth. Repot plants when roots outgrow their container, typically during spring. Use proper tools and techniques to ensure success.

When and How to Repot Your Plants

Repot indoor plants when their roots outgrow the container, typically in spring or summer. Choose a pot slightly larger than the current one. Water the plant beforehand to loosen the soil. Gently remove the plant, tease out tangled roots, and trim old or circling roots. Place the plant in fresh potting soil, water thoroughly, and provide optimal conditions for recovery and growth.

Techniques for Successful Repotting

For successful repotting, water the plant a day in advance to soften the soil. Use a pot slightly larger than the current one and fresh, well-draining potting mix. Handle the root ball gently, trimming only damaged or circling roots. Place the plant at the same depth as before, fill gaps with soil, and water thoroughly. Avoid over-handling roots to prevent shock, ensuring a smooth transition for healthy regrowth and stability.

Common Challenges and Solutions

Address pests with neem oil, treat diseases by pruning infected areas, and adjust watering schedules to prevent root rot. Ensure optimal growth by resolving these issues promptly.

Pests and Diseases in Indoor Plants

Common pests like spider mites, mealybugs, and scale can infest indoor plants. Regularly inspect leaves and stems for signs of infestation. Treat with neem oil or insecticidal soap. Overwatering often leads to root rot and fungal diseases. Ensure proper drainage and avoid waterlogged soil. Isolate infected plants to prevent spread and maintain good air circulation for healthy growth.

Preventing Common Problems

Prevent overwatering by using unglazed pots and well-draining soil. Maintain consistent humidity levels and avoid placing plants near drafts or extreme temperatures. Regularly inspect plants for pests and treat early to prevent infestations. Ensure proper light placement to avoid scorched leaves. Fertilize sparingly during the growing season to promote healthy growth and vibrant foliage.

Organic Solutions for Healthy Plants

Use neem oil to naturally combat pests and diseases. A mild soap solution can effectively control insects without harming plants. Add a few drops of ammonia to water for improved foliage color and growth. These organic methods promote healthy plants while avoiding harsh chemicals, ensuring a natural and thriving indoor garden environment.

Pruning and Grooming

Pruning involves trimming plants to maintain shape and health, using tools like scissors or shears. Regular grooming, including leaf cleaning, enhances appearance and promotes healthy growth.

Pruning Tools and Techniques

Use clean, sharp tools like scissors, shears, or pruning saws for precise cuts; Regular pruning keeps plants healthy and looking their best. Remove dead leaves, trim overgrown branches, and shape plants for better growth. Prune during the active growing season to minimize stress. This helps maintain plant health and appearance effectively.

When to Prune Your Indoor Plants

Prune your indoor plants during the growing season (spring and summer) to encourage new growth. Remove dead or damaged leaves and stems to prevent disease. Trim overgrown branches to maintain shape and promote healthy development. Cut back flower stems after blooming to redirect energy to foliage. Regular pruning helps improve airflow and light penetration, keeping your plants strong and vibrant year-round.

Propagation Methods

Explore effective techniques for propagating indoor plants, including stem cuttings, leaf propagation, and division. Ensure proper care post-propagation for healthy growth, as outlined in indoor plant guides.

How to Propagate Indoor Plants

Propagate indoor plants through stem cuttings, leaf propagation, or division. Choose healthy sections, ensure proper rooting conditions, and maintain consistent moisture. Provide bright, indirect light and avoid over-watering. Rooting hormone can enhance success. Monitor growth and transfer to individual pots once established. Detailed steps are available in indoor plant care guides for optimal results.

Caring for New Plants After Propagation

After propagation, provide new plants with bright, indirect light and moderate watering. Maintain optimal temperatures and humidity. Avoid over-handling to prevent stress. Fertilize lightly once roots establish. Monitor growth and adjust care as needed. Detailed guidance for nurturing young plants is available in indoor plant care guides, ensuring healthy development and robust growth.

Seasonal Care Tips

Adapt your plant care strategies to seasonal changes. Adjust light, water, and temperature to match the environment, ensuring optimal growth and health throughout the year.

Winter Care for Indoor Plants

During winter, reduce watering as plants grow slower. Use humidifiers to combat dry air and avoid placing plants near drafts or heating vents. Prune less frequently, as growth slows, and fertilize sparingly. Maintain temperatures between 65-75°F during the day and slightly cooler at night. Ensure plants receive sufficient light, possibly supplementing with grow lights if natural light is scarce.

Summer Care for Indoor Plants

In summer, indoor plants thrive with increased light and warmth. Water more frequently, but avoid overwatering to prevent root rot. Fertilize regularly to support growth. Keep plants away from direct sunlight to avoid overheating, using sheer curtains if necessary. Maintain temperatures between 65-75°F. Humidity levels can drop, so mist leaves or use a humidifier. Monitor for pests, as warmer months increase their activity, and treat promptly if necessary.

Monitoring Plant Health

Regularly inspect your plants for vibrant leaves and strong stems. Watch for signs of stress, like yellowing leaves or pests. Adjust care routines as needed to ensure optimal growth and address any issues promptly for thriving indoor plants.

Observing Leaf Health and Color

Monitor your plants’ leaves regularly for vibrant colors and strong structures. Yellowing leaves may indicate overwatering or nutrient deficiencies, while browning tips could signal excessive fluoride or dry air. Ensure proper light exposure, as insufficient light can dull foliage. Adjust watering and fertilization routines based on leaf health to maintain robust growth and prevent pests or diseases from taking hold.

Creating a Plant Care Schedule

Develop a consistent routine to ensure your plants thrive. Schedule watering based on soil moisture, typically every 1-2 weeks, and fertilize monthly during the growing season. Rotate plants for even light exposure and prune as needed. Track seasonal changes, adjusting care for winter dormancy and summer growth spurts. A well-organized plan helps maintain healthy, vibrant plants year-round.

Creating a Plant-Friendly Environment

Ensure optimal conditions by maintaining proper humidity levels and avoiding extreme temperatures. Use humidifiers for tropical plants and place them away from drafts. Optimize light placement for balanced growth, such as east or west-facing windows. Group plants together to naturally increase humidity and create a thriving indoor ecosystem.

Grouping Plants to Increase Humidity

Grouping plants together creates a microclimate that maintains humidity levels. Plants release moisture through transpiration, benefiting neighboring plants. This method is especially effective for tropical species. Place plants on a tray filled with water and pebbles to enhance humidity further. Regular misting and using a humidifier can also support this natural process, ensuring vibrant and healthy growth in indoor spaces.

Using Humidifiers for Tropical Plants

Humidifiers are essential for tropical plants that thrive in high-humidity environments. These devices maintain optimal moisture levels, preventing leaf curl and dryness. Place the humidifier near plant groupings to maximize benefits. Regular monitoring ensures the air doesn’t become overly saturated, which can lead to mold growth. This method complements natural transpiration, creating a balanced ecosystem for lush, healthy tropical plants indoors.

Optimizing Light Placement

Position plants according to their light requirements. Place low-light plants like snake plants or pothos in shaded areas, while sun-loving species such as succulents or citrus trees thrive near bright windows. Rotate plants seasonally to adapt to changing sunlight patterns, ensuring even growth and preventing lopsided development. Proper light placement enhances photosynthesis, promoting vibrant colors and robust health in your indoor plants.

Advanced Tips for Experienced Growers

Explore expert techniques like plant rotation for balanced growth and collecting rare species. Refine your skills with advanced pruning methods and experiment with unique propagation strategies.

Plant Rotation for Even Growth

Rotate plants regularly to ensure even light distribution, promoting symmetrical growth. This technique prevents lopsided development and encourages balanced foliage. Rotate plants every 1-2 weeks, especially those in low-light conditions, to maximize exposure to available light sources. Consistent rotation mimics natural outdoor growth patterns, leading to healthier, more aesthetically pleasing indoor plants. This simple practice enhances overall plant structure and appearance.

Collecting Rare and Exotic Plant Varieties

Enthusiasts seeking unique additions to their indoor spaces often pursue rare and exotic plant varieties. These plants, often sourced from specialized nurseries or online communities, offer distinctive features and beauty. Ensure sustainability by obtaining plants legally and ethically. Research specific care requirements, as these plants may need tailored conditions like high humidity or filtered light. Invest in proper equipment, such as humidifiers or grow lights, to replicate their natural habitats. Regularly monitor temperature fluctuations and watering needs, as exotic plants can be more sensitive. Experiment with propagation methods like cuttings or division to share or expand your collection. Always check local regulations before acquiring rare species to avoid legal issues. With dedication and proper care, these plants can thrive and become standout pieces in your indoor garden.

Bybeatrice

viper car starter manual

Welcome to the Viper Car Starter Manual. This guide provides a comprehensive overview for enhancing your vehicle’s security and convenience with the Viper remote start system. Designed for both novice and experienced users, it covers installation, safety checks, and programming for optimal performance.

Overview of the Viper Remote Start System

The Viper Remote Start System is a cutting-edge solution designed to enhance your vehicle’s convenience and security. This advanced system allows users to start their car’s engine remotely, ensuring comfort in extreme weather conditions. With its universal compatibility, it can be installed in most vehicles, including manual transmission cars, though specific safety features like the Manual Transmission Start (MTS) mode must be properly configured. The system integrates seamlessly with existing factory security features, offering a user-friendly experience. Its reliability and robust design make it a popular choice among car owners seeking a blend of functionality and peace of mind. Follow this guide for a smooth installation and setup.

Importance of Proper Installation and Setup

Proper installation and setup of the Viper Remote Start System are crucial for ensuring safety, reliability, and optimal performance. Incorrect wiring or configuration can lead to system malfunctions, vehicle damage, or even safety risks. For manual transmission vehicles, proper setup is especially critical to prevent unintended starts or movements. Following the manufacturer’s guidelines and conducting thorough safety checks minimizes these risks. Additionally, incorrect installation can void the product warranty or lead to potential legal issues. It is highly recommended to have the system installed by an authorized Directed Electronics dealer to ensure compliance with safety standards and proper functionality. This step guarantees a seamless and secure remote starting experience for your vehicle.

Pre-Installation Requirements

Before installing the Viper Remote Start System, ensure your vehicle is compatible, gather all necessary tools, and review the installation manual for specific requirements.

Understanding Vehicle Compatibility

Ensuring your vehicle is compatible with the Viper Remote Start System is crucial for proper functionality. Modern vehicles, including manual transmission models, are generally supported, but specific requirements may apply. Check the Viper compatibility chart to confirm your vehicle’s make, model, and year are listed. Manual transmission vehicles require MTS mode setup during installation to prevent unintended movement. Refer to the installation guide for specific instructions tailored to your vehicle type. Compatibility varies by system, so verify features like automatic transmission, immobilizers, and existing security systems to ensure seamless integration with the Viper Remote Start.

Gathering Necessary Tools and Materials

To ensure a smooth installation of your Viper Remote Start System, gather all required tools and materials beforehand. Essential items include a wiring harness, soldering tools, and a multimeter for testing connections. Additionally, you’ll need basic hand tools like screwdrivers, pliers, and wrenches. Refer to the installation manual for a detailed list specific to your system. Organize these tools to avoid delays. Ensure you have a clean, well-lit workspace and consult your vehicle’s manual for any vehicle-specific tools. Proper preparation will help you navigate the installation process efficiently and effectively.

Installation Steps

Begin by disconnecting the battery for safety. Connect the wiring harness to your vehicle’s electrical system, ensuring all wires are securely attached. Mount the remote start module in an accessible location. Follow the manual’s instructions for proper connections and configurations. Test the system to ensure functionality before finalizing the setup. Refer to the guide for specific instructions tailored to your vehicle’s make and model.

Wiring and Connection Setup

Connect the battery wires first, ensuring the positive and negative terminals are correctly linked. Locate the ignition, accessory, and starter wires in your vehicle. Use the Viper wiring harness to connect these wires to the remote start module. Verify each connection to avoid short circuits. For manual transmissions, enable the MTS mode to prevent unintended starts. Follow the manual’s color-coded guide for precise wiring. Double-check all connections before moving to the next step. Proper wiring ensures reliable performance and safety. If unsure, consult the installation guide or a professional installer for assistance. This step is crucial for the system’s functionality.

Mounting the Remote Start Module

Mount the Viper remote start module in a secure, dry location, preferably under the dashboard. Ensure it is away from moving parts and heat sources. Use the provided mounting bracket to fasten the module. Connect the antenna to the module and position it for optimal signal reception. Avoid drilling near sensitive vehicle components. Secure all wires neatly to prevent interference. Refer to the manual for specific placement recommendations. Once mounted, double-check all connections for tightness. Ensure the module is level and firmly attached to prevent vibration damage. If unsure about the location, consult the installation guide or seek professional assistance. Proper mounting ensures reliable operation and longevity of the system.

Finalizing the Installation

After completing the wiring and module mounting, thoroughly test the remote start system to ensure proper functionality. Conduct a Safety Check to verify all features operate correctly. Program the remote start by following the Virtual Tach process, which may require multiple engine cranks. Ensure all wires are securely connected and tucked away to prevent interference. Review the installation guide for model-specific instructions, especially for manual transmissions. Once everything is confirmed to be working, clean up any excess wiring and secure loose connections. Finally, test the remote start in various conditions to ensure reliability. Consult the manual for any additional settings or features to activate. Proper finalization ensures safe and efficient system operation.

Safety Checks and Precautions

Ensure all safety guidelines are followed to avoid system malfunctions. Always perform a Safety Check post-installation to verify proper operation. Adhere to manufacturer instructions to prevent vehicle damage.

Pre-Installation Safety Guidelines

Before starting the installation, ensure all safety precautions are followed to avoid potential risks. Disconnect the vehicle’s battery to prevent electrical hazards. For manual transmission vehicles, extra care is required to prevent unintended starts. Always test the system in a safe, open area away from flammable materials. Ensure the parking brake is engaged and the vehicle is in park or neutral. Avoid bypassing any safety features, as this could lead to system malfunctions. Refer to the manual for specific guidelines tailored to your vehicle type. If unsure, consult a professional installer to ensure compliance with safety standards.

Post-Installation Testing Procedures

After completing the installation, conduct thorough testing to ensure the Viper remote start system functions correctly. Begin by using the remote to start the engine, verifying it operates smoothly. Check that the vehicle does not move during testing by ensuring the parking brake is engaged. Test all safety features, such as the brake pedal switch, to confirm they halt the remote start process. Ensure the system shuts down properly when the key is inserted or the brake is pressed. For manual transmission vehicles, verify the MTS mode is correctly set to prevent unauthorized starts. Repeat tests in different conditions to confirm reliability. Always refer to the manual for specific testing protocols tailored to your vehicle type.

Programming the Remote Start

Program the remote start by following the virtual tach setup. After installation, remote start the engine; it may require three cranks before running smoothly.

Virtual Tach Programming

Virtual Tach Programming is essential for accurate engine speed detection. After installation, remote start the engine; the system may require three ignition cycles to synchronize. Ensure the vehicle is in park and apply the brake. Follow the manual’s steps to complete the tach setup for proper functionality. This step is crucial for manual transmission vehicles to prevent unauthorized starts. Always refer to the user guide for specific instructions tailored to your Viper model.

Setting Up Remote Start Features

Configuring your Viper remote start features ensures seamless operation. Begin by programming the remote to match your vehicle’s settings. Use the provided button combinations to activate features like automatic start, temperature monitoring, and timer settings. Test each function to ensure proper operation. For manual transmissions, ensure MTS mode is enabled to prevent unauthorized starts. Follow the manual’s step-by-step guide for precise setup. After programming, perform a test run in a safe environment to confirm all features work as intended. Proper configuration enhances both convenience and security, ensuring your Viper system performs reliably under various conditions. Always refer to the manual for specific instructions tailored to your vehicle.

Troubleshooting Common Issues

Identify issues like wiring faults or remote malfunctions. Consult the manual for diagnostic steps. Test the system to isolate problems and resolve them promptly for optimal function.

Identifying and Resolving Installation Problems

Start by checking wiring connections for looseness or incorrect links. Verify the remote start module is properly mounted and connected. If issues persist, consult the manual or a professional. Test the system after addressing problems to ensure functionality. Regular checks can prevent future malfunctions, ensuring your Viper remote start operates smoothly and efficiently.

Addressing Remote Start Malfunctions

Start by checking the remote’s battery and connections. Replace or recharge the battery if necessary. Ensure all wiring is secure and free from corrosion. Check the antenna placement and signal strength. If issues persist, reset the control module or reprogram it as per the manual. Verify the parking brake status and ensure it’s fully released. Perform a system reset by disconnecting the battery or following specific button sequences. Consult the troubleshooting guide or contact customer support for persistent problems. Addressing malfunctions promptly ensures optimal performance and security of your Viper remote start system.

Successful installation and programming ensure optimal performance. Troubleshooting guides help resolve issues quickly. Follow the Viper manual for a secure and convenient remote start experience.

Best Practices for Ongoing Maintenance

Regularly inspect the wiring and connections to ensure they remain secure and free from damage. Check the battery voltage and charging system to maintain optimal performance. Update the remote start software periodically to access new features and improvements. Test the system after any modifications or repairs to ensure proper functionality. Keep the remote controls clean and dry to prevent malfunctions. Avoid extreme temperatures and moisture exposure to protect the module. Consult a professional if unsure about any maintenance steps. By following these practices, you can ensure your Viper remote start system operates reliably and efficiently over time.

Final Tips for Optimal Performance

For optimal performance, always follow the manufacturer’s guidelines and ensure proper installation. Regularly test the remote start system after installation and any updates. Keep the remote controls away from extreme temperatures and moisture. Avoid using the remote start in areas with high electromagnetic interference. Ensure the vehicle’s battery is in good condition to prevent system malfunctions. Periodically review and update the system’s software for the latest features. If issues arise, consult the user manual or contact a certified professional. By adhering to these tips, you can enjoy reliable and efficient operation of your Viper remote start system for years to come.