Denture repair kits offer a convenient solution for fixing broken or cracked dentures at home. The Repair-It Denture Repair Kit provides everything needed to mend breaks‚ cracks‚ and loose teeth quickly and safely‚ making it an ideal emergency repair solution.
1.1 Overview of the Repair-It Denture Repair Kit
The Repair-It Denture Repair Kit is a comprehensive solution designed for emergency denture repairs at home. It includes all necessary materials‚ such as a repair resin mixture‚ applicator‚ and instructions‚ to fix broken or cracked dentures quickly. The kit is ideal for mending fractures‚ reattaching loose teeth‚ or filling gaps‚ ensuring your dentures function properly until professional help is available. With its advanced zinc-free formula‚ the repair resin sets in about 60 minutes‚ allowing you to eat comfortably soon after application. The kit is user-friendly‚ portable‚ and suitable for minor repairs‚ making it a practical option for denture wearers seeking a convenient and cost-effective solution.
1.2 Importance of Proper Denture Repair
Proper denture repair is essential to maintain the functionality and comfort of your dentures. Neglecting repairs can lead to further damage‚ making the dentures uncomfortable to wear and potentially causing issues like chewing difficulties or speech problems. Improperly repaired dentures may also result in uneven wear‚ shifting‚ or irritation to the gums‚ which can lead to more severe oral health concerns over time. Using a reliable repair kit‚ such as the Repair-It Denture Repair Kit‚ ensures that your dentures are securely fixed and properly aligned‚ restoring their original fit and performance. While these kits are designed for temporary fixes‚ they play a crucial role in preventing further damage until professional dental care can be sought.
Safety Precautions and Preparation
Always wear gloves and work in a well-ventilated area. Ensure the workspace is clean and dry. Follow the manufacturer’s instructions carefully to avoid errors and ensure safety.

2.1 Essential Safety Tips Before Starting the Repair
Before starting the repair‚ ensure you wear protective gloves to prevent skin irritation. Work in a well-ventilated area to avoid inhaling any fumes from the repair materials. Keep the kit components away from children and pets. Avoid using the repair kit if you have sensitive skin or allergies to the materials listed. If you experience any discomfort or adverse reactions‚ discontinue use and consult a professional. Always read the instructions thoroughly and follow them precisely to ensure a safe and effective repair. Remember‚ these kits are designed for temporary fixes‚ and for more severe damage‚ professional dental assistance is recommended.
2.2 Gathering Necessary Materials and Tools
To ensure a successful repair‚ gather all materials and tools provided in the Repair-It Denture Repair Kit. These typically include the repair liquid‚ powder‚ an applicator‚ and a spatula. Additionally‚ have a clean‚ dry cloth‚ a well-ventilated workspace‚ and protective gloves ready. Organize all items on a stable surface to avoid misplacement. Ensure the denture is completely dry and free from debris before starting. If extra tools like a small bowl or mixing stick are needed‚ prepare them in advance. Proper preparation ensures the repair process is efficient and stress-free. Always refer to the kit’s instructions for specific items required‚ as some kits may vary in content.

Step-by-Step Instructions for Denture Repair
Follow a systematic approach: clean the denture‚ mix the repair resin‚ apply it to damaged areas‚ and let it set. Ensure proper alignment and drying for durability.
3.1 Cleaning and Drying the Denture
Cleaning and drying the denture is the first critical step in any repair process. Start by gently scrubbing the denture with a soft-bristled toothbrush and mild soap under warm water to remove plaque‚ food particles‚ and debris. Avoid using harsh chemicals or abrasive materials that could damage the denture. Rinse thoroughly to ensure all residue is removed. Next‚ dry the denture completely with a clean‚ lint-free cloth‚ paying extra attention to the cracked or broken areas. Moisture can interfere with the repair material’s adhesion‚ so ensure the denture is entirely dry before proceeding. Proper preparation ensures a stronger and more durable repair‚ making this step essential for a successful outcome.
3.2 Mixing the Repair Resin
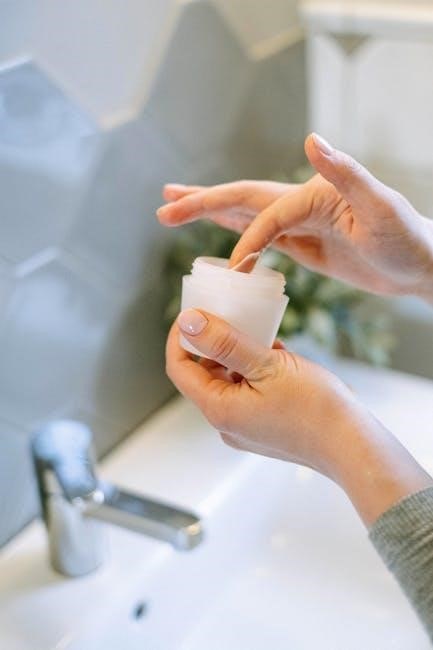
Once the denture is clean and dry‚ prepare the repair resin according to the kit’s instructions. Typically‚ this involves combining the liquid and powder components in the correct proportions to achieve a smooth‚ workable paste. Use the provided mixing tool or a clean‚ flat surface to blend the materials thoroughly‚ ensuring no lumps remain. Mix only the amount needed for the repair to avoid waste. Allow the mixture to sit for a few moments to reach the optimal consistency for application. Properly mixed resin ensures a strong bond and durable repair. Always work in a well-ventilated area and avoid inhaling the powder. Mixing the resin correctly is crucial for a successful repair‚ so take your time and follow the instructions carefully.
3.3 Applying the Repair Mixture
Using the spatula provided‚ carefully apply a thin‚ even layer of the mixed repair resin to the chipped‚ cracked‚ or broken areas of the denture. Ensure complete coverage of the damaged section‚ spreading the mixture smoothly to avoid air bubbles. If reattaching a broken piece‚ press it firmly into place and hold for a few seconds to secure it. For missing teeth or gaps‚ shape the mixture to fit the area‚ ensuring a natural appearance. Avoid applying too much resin‚ as this can lead to unevenness. Once applied‚ gently wipe away any excess with a clean cloth. Proper application ensures a strong and durable repair‚ restoring both function and comfort to your dentures.
3.4 Allowing the Repair to Set

After applying the repair mixture‚ allow it to set at room temperature for the recommended time‚ usually around 60 minutes. Avoid moving or disturbing the denture during this period‚ as this could disrupt the bonding process. Once set‚ the repair will harden and become durable enough for normal use. If necessary‚ rinse the denture with warm water to remove any excess residue. Ensure the repair is completely dry before reinserting the denture into your mouth. Proper setting is crucial for the longevity and effectiveness of the repair. Avoid rushing this step‚ as premature use could weaken the bond and lead to further damage. Once set‚ your denture should feel secure and functional‚ ready for everyday use.

Aftercare and Maintenance
Proper care and maintenance are essential to extend the life of your repaired dentures. Clean them regularly with mild soap and water‚ using a soft-bristled toothbrush. Avoid harsh chemicals and abrasive materials. Soak dentures overnight as recommended. Regular dental check-ups ensure optimal fit and functionality‚ preventing further damage. By following these steps‚ you can maintain your dentures in excellent condition for years to come.
4.1 Tips for Extending the Life of Your Dentures
To extend the life of your dentures‚ practice good hygiene by cleaning them daily with mild soap and water. Avoid using harsh chemicals or abrasive materials that can damage the acrylic or metal components. Store dentures in a protective case when not in use to prevent accidental breaks or cracks. Regularly inspect for signs of wear‚ such as chips or loose teeth‚ and address them promptly. Soaking dentures overnight can help maintain their shape and prevent warping. Additionally‚ attend routine dental check-ups to ensure proper fit and make necessary adjustments. By following these care tips‚ you can significantly prolong the durability and comfort of your dentures.
4.2 When to Seek Professional Help
While denture repair kits are effective for minor fixes‚ there are situations where professional help is essential. If the break is extensive or affects the structural integrity of the denture‚ a dentist or dental technician should handle the repair. Additionally‚ if the repair kit fails to hold or if the denture becomes uncomfortable or ill-fitting after a repair‚ seek professional assistance. Persistent issues‚ such as repeated breaks or cracks‚ also indicate the need for expert intervention. A professional can ensure a proper fit and durability‚ preventing further damage or potential health risks. Remember‚ improper repairs can lead to more severe problems‚ so don’t hesitate to consult a dental expert when in doubt.